

Last Updated on October 29, 2023 by maximosecrets
Contents
This is the second of a series of articles to discover the capability of the new Maximo Mobile applications. The system I am using has Maximo Mobile 8.3 installed, this is the November 2021 release, in System Information it indicates IBM Maximo Application Framework 8.6.0.0 Build 20211012-1522 DB Build V7600-18. I am initially using a desktop browser; at some later date I will probably look to write some articles from a mobile phone or tablet perspective.
The Maximo Mobile applications are currently found in the Work Order module and Role Based Applications sub-module. This article will review the Work Approvals mobile application. This was first released as part of Maximo Mobile 8.3, a very new application. There is a lot to cover, and I have split the article into 2 parts.
The first article in the series on the Maximo Mobile Service Request application can be found here – http://maximosecrets.com/2022/01/12/maximo-mobile-service-requests/
View Work Orders

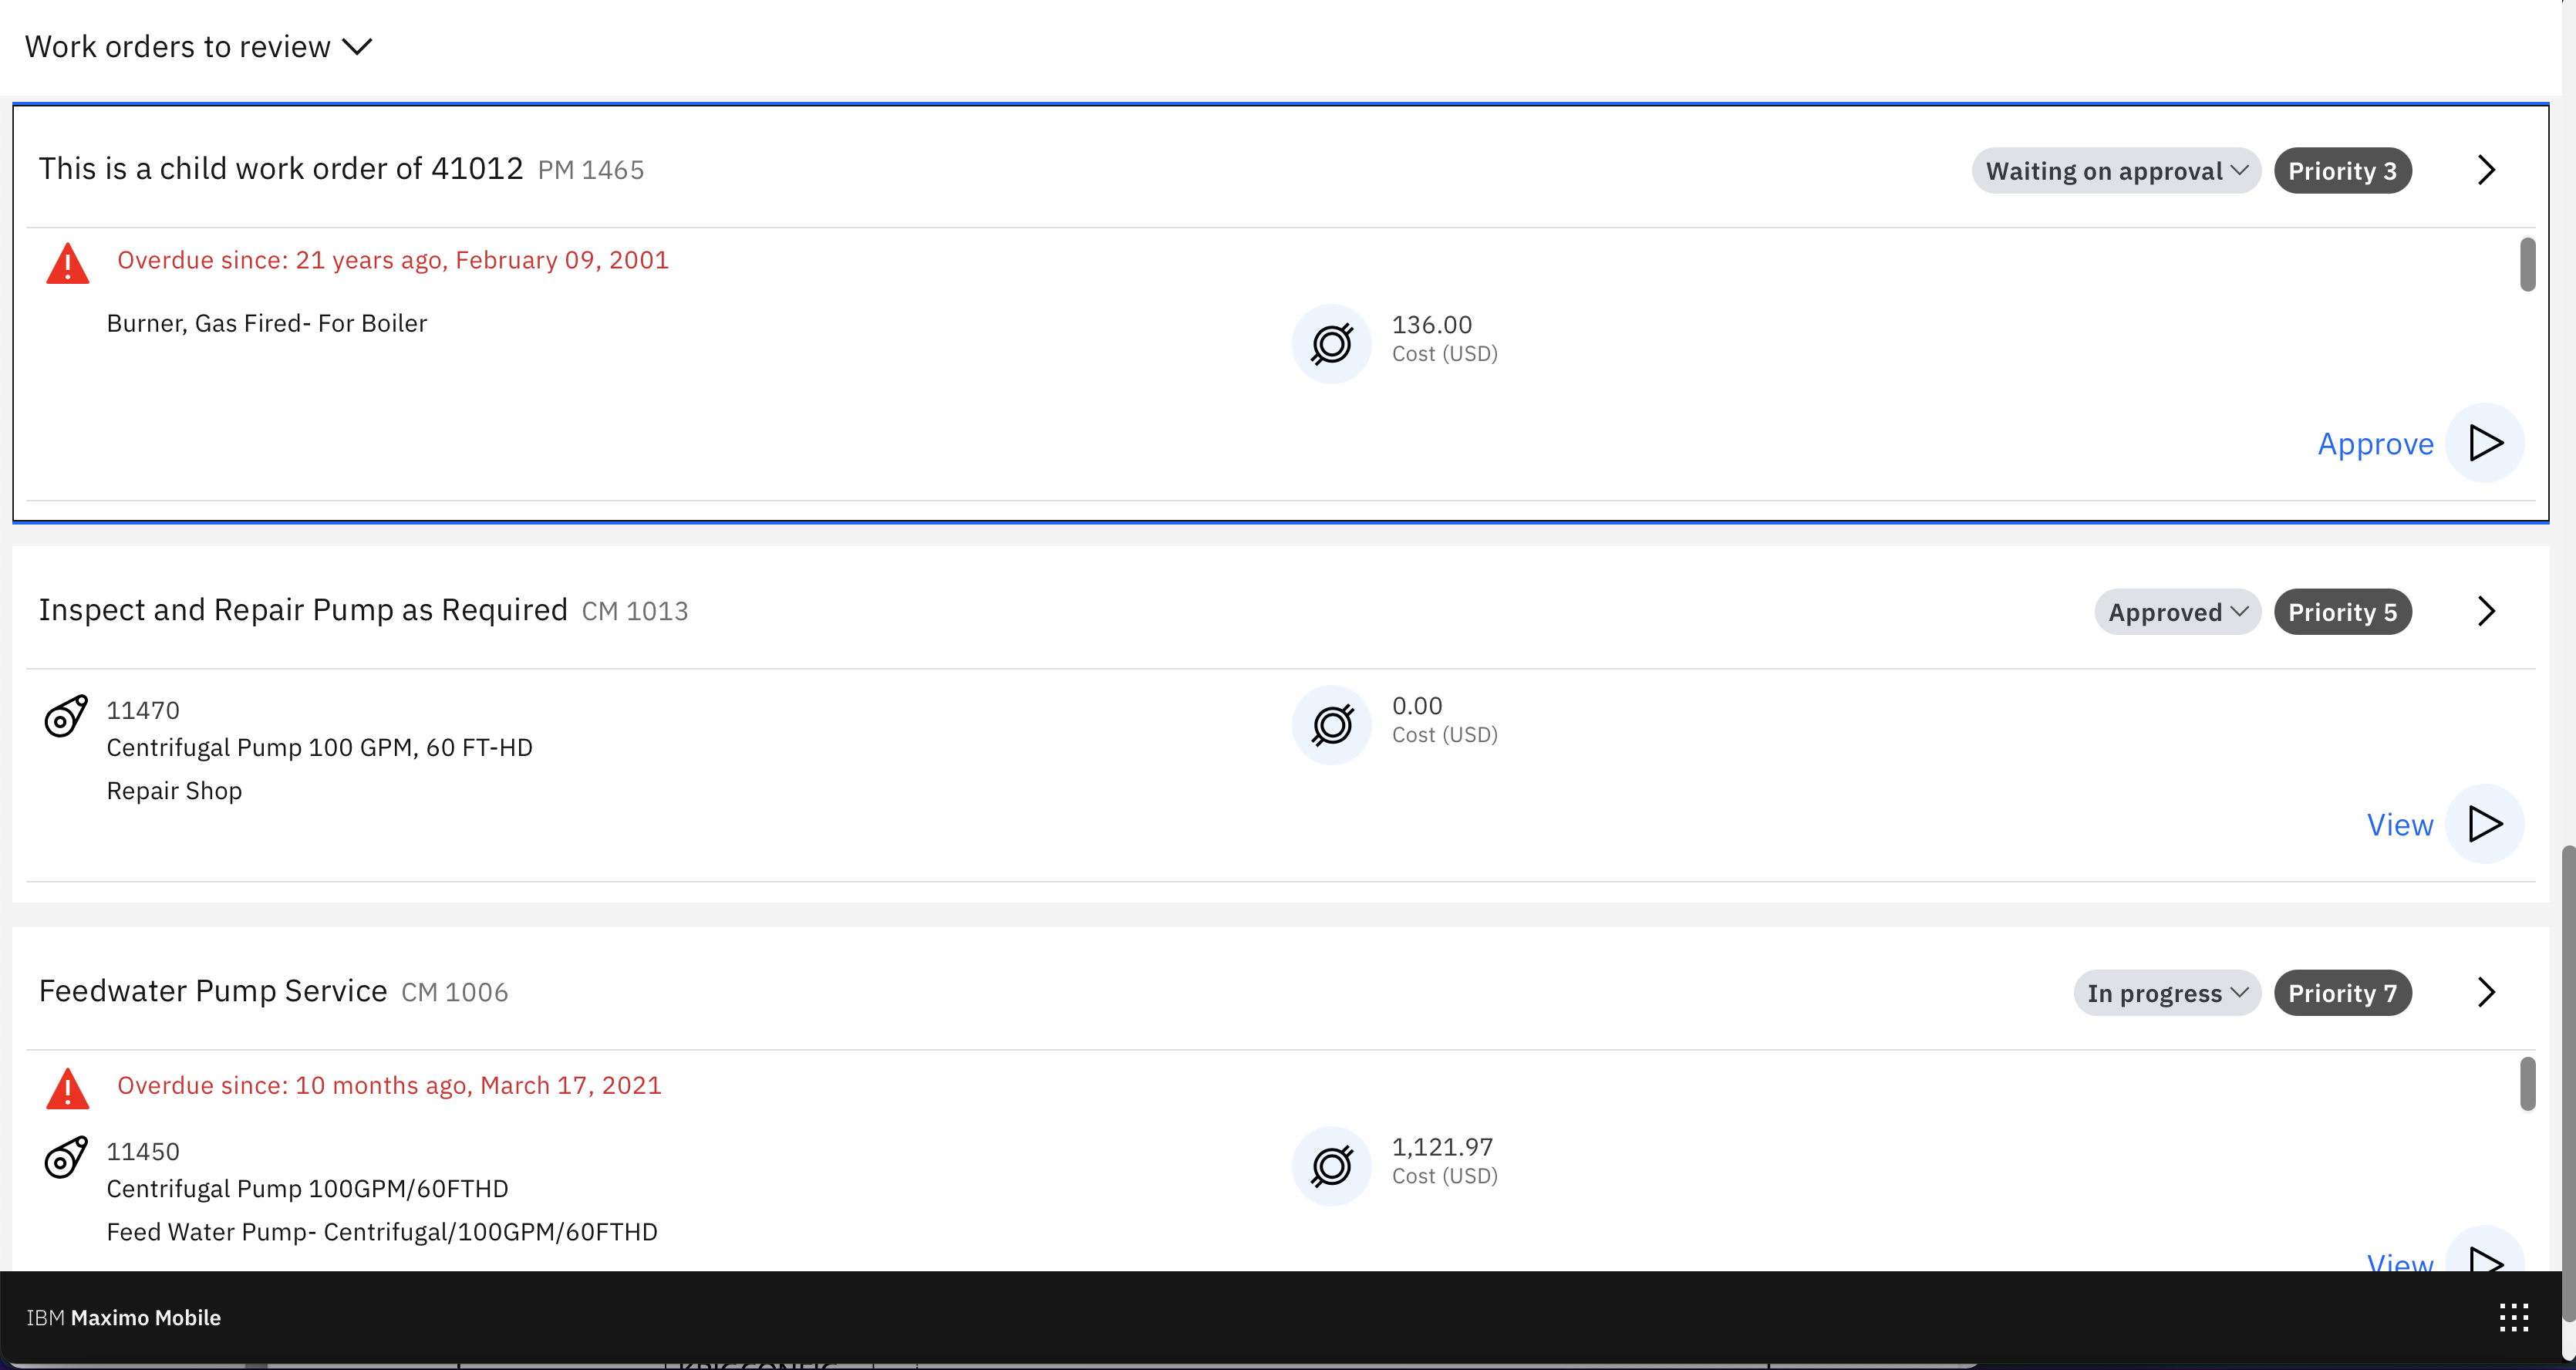
When the Work Approvals application opens, along the top and on the left is a query – Work orders to review. There is no button for creating a new work order and by the looks of things no pages for reviewing existing Service Requests and approving or rejecting these, but then this is the first release of this application. There are 7 records in the Work order to review query, I am logged in as user WILSON.
Each work order is in its own panel which has two sections:
- Top section has the Description followed by the work type and work order number, and on the right the status, priority and a button (>) to open the work order.
- Bottom section has the Asset number with below this the asset description and below this the location description but no reference to the location, only its description. In the middle is the Total Current Estimate and on the far right, the blue button, which might say View or Approve. The button next to the total estimate will open a page which shows the cost breakdown, I’ll show that in a minute.
For PMs that are overdue there is a message in red text “Overdue since: 20 years ago, October 28, 2001”. The date in the message is the target finish of the PM. I did check with a work order of CM work type and entered a target finish earlier than today, but it did not provide any red text, so I think it only occurs for the work type of PM. Yes, there is some old data in the MAXDEMO database. Incidentally there is an RFE (Request for Enhancement) on the IBM MAS Ideas Portal, to update the MAXDEMO database, you can vote for it here – https://ibm-ai-apps.ideas.ibm.com/ideas/search?query=replace+the+maxdemo

In the Work Order Tracking application, it looks as if the default query – Work order to review – are those work orders where the Supervisor is equal to the logged in user. I think all statuses up to but excluding synonyms of Completed, Cancelled and Closed (COMP, CAN, CLOSE) would be shown. Notice, the emphasis of Supervisor equals to. If you make the query in the Advanced Search in the Supervisor field don’t forget to type =WILSON, otherwise it will also find work orders for CSWILSON.

Using the button to the left of the work order cost opens the Current Estimate which includes labor, materials, service and tool costs and the labor hours (in the middle). These are the costs and hours that have been entered direct against the work order and does not include work order hierarchy costs.
Note. If you get the error “BMXAA7095E – The entered value 4,473.000 is not valid. Enter a valid decimal value.” It is likely to be the language setting of the operating system that Websphere is running on – https://www.ibm.com/support/pages/bmxaa7095e-entered-value-xx-xxxxx-not-valid-enter-valid-decimal-value

When I was testing the costs to see if there were hierarchy costs, I had added a new child work order to work order 41012 and added some planned labor. The new work order 1465 inherited the Supervisor of WILSON from the parent work order and its dates were rolled down. After using the “Check for updates” button I was thrown for a while because suddenly there were 8 records instead of 7, and I am the only person using this VM. Fortunately, I had called the work order 1465 “This is a child work order of 41012” and so it was easy to spot the new record.
Notice for work order 1465 there is a button that says Approve (in blue text), whereas for the other work orders it says View. If you press the Approve button it approves the work order, it doesn’t give you the opportunity to enter a memo. You can change status by clicking the status button, as we will see later, and from this dialog you get the ability to enter a memo.
If you look closely at some of the work orders over on the right-hand side, PM 1465 and CM 1006, there is a vertical scrollbar on these two records but there was nothing to scroll down to.

At the top of the screen is a Search button which opens a search bar that spans the width of the application. This allows you to search by description, asset number, asset description or location description, work type or status, for example you can search either In Progress or INPRG. It looks also as if the search bar allows you to make a search by scanning on the location or asset. The (X) button next to the search bar, clears the search. The number of work orders found by the search, “boiler” in this case, is shown below the search bar, 2 records found.
The other thing I discovered when trying to scroll vertically down in a work order was that clicking on a row you receive a message at the top of the screen that shows “one record selected”. It appears in the same space as the search bar. I couldn’t get this to increment to two records and there was no action that appeared to work when a record was selected.
Review a Work Order

I have followed the blue button and navigated into the top work order 42001 – Inspection and Certification, with a work type of PM. Also shown in the top banner on the right is the current status (Approved), work priority (3) and a button that allows you to edit the work order (see later).
In the Details section and on the left-hand side are:
- Work order Long Description
- Work order Total Cost – $472.75. The button to the left of the amount opens the Current Estimate dialog which we saw earlier.
On the right-hand side are fields for:
- Scheduled Start and Scheduled Finish
- Duration – 4 hours
- A Map button, which when clicked says “Map is not configured”. I’ll have to see if I can get maps configured for the new mobile applications. If there is no Service Address the map button is not shown.
- The Formatted Address, the address set from the map when you associate a Service Address. There is no formatted address, hence a hyphen.
The three buttons below this are:
- Materials and Tools
- Work Log
- Report Work
In the Asset and location section and on the left-hand side are:
- A button showing the asset status – currently Up
- The Asset Number – 11430
- Asset Description – Centrifugal Pump 100GPM/60FT HD
- LocationA physical place where assets exist and where work can be performed. More Description – Condensate Return Pump- Centrifugal/100GPM/60FTHD. The location number is not shown.
On the right-hand side is a picture of the asset’s image. You can zoom in/out and pan around on this.

There is a vertical scrollbar and below the Asset and location section are buttons for:
- Scanning the asset
- Reviewing meters
- Reviewing asset and location history
- Changing asset status and reporting downtime
The two big buttons below this are:
- Attachments – which show the number of attachments
- Follow-up work – which shows related records and allows you to create a follow-on work order
These will be discussed in the second part to the Maximo Mobile Work Approval article.
Right at the bottom of the page are three fields:
- Reported on (REPORTDATE)
- Reported by (REPORTEDBY)
- Contact (PHONE)
These fields are populated, it was just that they all had null values on work order 42001.
Work Order Long Description

I have gone to another work order 1465 and entered a long description with rich text formatting. When there is a work order long description it is displayed in the Details area on the left-hand side instead of the hyphen indicating no data. The work order long description is shown as “This is the work order long description We’ll see whether RTF formatting works for it Here is some text that has been highlighted.” The display has stripped out the rich text formatting and the line breaks, however there is a button above the long description text.

This opens the long description full page and shows the three pieces of rich text formatting, bold on the first line, red text on the second, and red highlighting on the third line. The third line was actually smaller text, but it has not interpreted those tags. A URL link to Maximo Secrets also worked and launched the web site.
Materials and Tools

The Materials and Tools button shows the planned materials including the item and description, the storeroom and quantity required. The third item (P-896) without a storeroom is a direct issue item.
This is followed by the planned tools, the tool item and description, the tool hours and storeroom (if applicable), and a quantity of the tool. For the first tool, DRILL is the tool item and ROCKWELL DRILL PRESS is its description.
Work Log

The Work Log button opens the side bar that shows any existing work log records and allows the logged in user to create a work log record. In this case I wrote “Please can you say why you need two Rockwell Drill Presses for this work?”. The message is saved to the short description of the work log record created.

This message is saved to the work log with a type of CLIENTNOTE and appears at the top of the side bar, with the log note date and time and name of the person who raised the message – Mike Wilson in this case.
In the Work Order Tracking application logged on as AJE – Andrew Jeffery, a reply was entered, “Reason for tool” is the short description and “Mike, this is only a test. Please approve the WO.” was the long description text. There is no need to repeat the date/time for messages created on the same day, only to distinguish the people who created the messages.
Report Work

I approved work order 1465 from the Work Order Tracking application and entered some actual labor, materials and tools and a failure report.
From the Work Approval Mobile application, the third button in the details area of the work order is Report Work which displays the details entered.
- The Failure section shows the descriptions of the Failure Class, Problem, Cause and Remedy. There is a Pencil button suggesting this can be modified.
- The Labor section shows the single time entry I created for Steve Chalcott on January-14, 2022 for 2 hours of Actual Work Time. The Start and End date/times for the labor transaction are shown, including the time type.
- The Materials used section shows the three items that were issued from the Central Storeroom, the two filters and the tool item PUMP – FARVAL GREASE PUMP, which you can include in the actual materials when reporting issued items from a storeroom. The quantity issued of each item is shown along with the Issue Type ISSUE or RETURN.

At the bottom of the Report Work page are the Tools used. This shows a quantity of 1 of tool item DRILL – ROCKWELL DRILL PRESS being used for 4 hours.
Notice that you can edit the Failure Hierarchy (pencil icon) and you can add labor and materials, but there is no (+) button for additional Tools used, or to return the tools.
Edit Failure Report

The failure report had been entered in Work Order Tracking, but it could have been entered elsewhere. The supervisor using the Work Approvals application can review the failure report details and make changes. Here I am about to make a change to the Cause Code for a Flame Failure of a Gas Fired Burner Failure, by clicking the cause code the cause codes for this Failure Class and Problem Code are shown on the right. I will choose Pilot Malfunction by clicking the arrow on its right.

The Cause Code has now been replaced and the Remedy Code has been removed, and the cursor is positioned to choose one of the Remedy Codes. I chose Adjusted Pilot Positioning.
The Failure Remarks of the failure report can be modified. It shows the number of characters used and the total number allowed (21/50). The Failure date and time cannot be modified.
If there is no failure report, you can create one on this page starting at the level of the failure class.
Add Actual Labor

The (+) button in the Labor section allows the supervisor to enter new actual labor records from the side panel. The blue dot indicates mandatory fields.
- The Labor field defaults to the labor code of the logged in user but it can be changed. The list provided 48 names, which happened to be the set of labor that have a work site of BEDFORD.
- The labor transaction Type can be modified to the synonyms of the WORK type, i.e. Travel time (TRAV), Waiting for materials (WMATL) and Actual work time (WORK), see domain LTTYPE.
- The Start date and Start time can be selected from their lookups using the AM/PM format for time rather than using a 24-hour clock.
- The Hours, when entered, will calculate an End date and End time.
- The Craft and Skill level have been defaulted from the default craft of the selected labor. The lookup does show the secondary craft/skill levels of the selected Labor.
When the actual labor record has been entered you can use the blue tick at the top of the side panel and a new actual labor transaction will be created.
Add Actual Material

The (+) button in the Materials used section allows the supervisor to enter new actual material transactions from the side panel. The blue dot indicates mandatory fields.
- The Material field has a lookup on items. I’m uncertain about the exact query but it seems to be associated with the BEDFORD site. Possibly distinct inventory items for BEDFORD storerooms.
- The Storeroom field can be modified if there are multiple storerooms with the chosen item.
- The Bin number field shows both bin and below it the lot number if the item is lotted.
- The Quantity defaults to 1 but can be incremented with the +/- buttons.
- The Transaction type defaults to ISSUE but can be changed to RETURN.
When the actual material record has been entered you can use the blue tick at the top of the side panel and a new actual material transaction will be created.

If you select an item and it exists in multiple storerooms you get a second selection box to pick the storeroom, then if it exists in multiple bins a further selection box is shown. In the above screenshot the item chosen was a LOT item; when you are asked to select the bin you are actually selecting both the bin and the lot number at the same time. If you look at the first two records in the side bar A-4-9 is the bin, and A-431 and X123-23 are the two lots in that bin, with a quantity remaining of 16 and 3 respectively.
Meter Readings

For work order 1465 I’ve changed the location and asset in order to test the meter functionality:
- Asset TEST01 with a description of “Meter Group”, has 4 meters associated with it.
- Location TEST10 with a description of “Test of a meter group for a location” has 2 meters associated with it.

When you use the Meter Readings button the meters for the asset and location are displayed, along with the last reading or measurement. For the asset TEST01 the top three are continuous meters and the fourth OILCOLOR is a characteristic meter. For location TEST10 both meters are of type gauge.
The only one of these meters with a previous reading is FUEL-G. The last reading was taken on 09/09/2021 3:06 pm and the last reading was 20. The Unit of Measure from the Meter record is shown alongside the meter, in this case GALS.

The Update button can be used to enter meter readings, but once you have entered each one and moved on to the next meter you can no longer change the value for continuous and gauge type meters, the symbol of a pencil with a line through it indicates that it is no longer editable.
I entered values for each of the asset and location meters, using the domain lookup for the characteristic meter to select CLEAR.
It seems that when you have entered the meter reading and you get the symbol of a pencil with a line through it, then you cannot back out of this using the (<) button at the top of the side panel, the new meter reading record has been saved at the point the symbol of a pencil with a line through it is displayed. Therefore, using the blue tick at the top of the side panel only submits characteristic meters. This might behave differently from a mobile device or tablet.

If you re-enter the Meter Readings dialog all the meters now have a value with the meter readings taken a few seconds ago.
Asset and Location History

The “Asset and location history” dialog is a view onto the Asset’s work order history and the Location’s work order history. For Asset TEST01 which has a description of Meter group:
- Work Order 1465 with a PM work type is displayed, its status is Waiting on approval (WAPPR).
- Work Order 1448 with no work type is displayed, its status is In progress (INPRG).
For Location TEST10 which has a description of Test of meter group for a location:
- Work Order 1465 with a PM work type is displayed, its status is Waiting on approval (WAPPR).
We are on work order 1465 and I wouldn’t have thought it was necessary to include the current work order in the asset and location history, especially as it takes up screen real estate for possibly two rows, one for the asset and the other for the location.
Asset Status and Downtime Reporting

The Asset Status dialog opens on the left-hand side panel and shows the Current status with two buttons, up and down arrows. The hyphen immediately below the Current status would show the date at which the asset went down, hence no date is displayed, just the hyphen. I selected the down arrow button and the downtime reporting panel opened. Notice the selected down arrow has a more defined ring around the button. The downtime reporting panel has fields for:
- Status date of the status change – 01/18/2022 (today).
- Time of the status change – 06:30 AM, the time lookup did not open.
- Downtime code – I selected Breakdown from the domain lookup.
I then used the blue tick at the top of the side panel to submit the downtime record for asset TEST01. This closes the left-hand side panel, and the asset now shows that it is Down.

When I opened the Asset Status dialog again the down arrow button is selected and the Current Status shows the downtime date, but not the time when the asset went down. I pressed the Up button and the panel opened below it to enter the date and time the asset went up – January 18, 2022 at 11:15am. The blue tick button at the top of the side panel was used again.
This concludes the first part of this article; you can continue to the second part which starts with the Attachments and Follow-up work buttons.
Leave a Reply