

Contents
Maximo Application Suite 9.0 was released on 25th June 2024, and this is the second part of my initial review. Again, a bit of a random selection but it will be where I have articles to update or where I want to write new ones.
Emissions Management

Emissions Management is part of the Operational Dashboard that you can find if you have the Health, Safety and Environment Manager (HSE) or the Oil & Gas Industry Solution installed. These applications have had supporting capabilities for environmental use cases for some time.
The emissions are not just associated with those with a CO2 impact, like Methane, NOx, SF6, or Refrigerants, but can include Sulphuric Acid, Benzene, Steam or Water. Basically, anything which leaks continuously, or occasionally through venting, a leak, or a spill, with the business goals to reduce the impact of long-term emissions, manage unplanned emissions and provide the information needed to support compliance reporting.
Intermittent or unplanned emissions (aka Fugitive) are detailed in the Incidents (HSE) application – Incident Events tab. You use a classification to define the type of emission, this can provide a hierarchy for reporting. The classification has a Use With Object of Incident Event (PLUSGINCEVENT). The Emission Details section appears if you chose an Event Type of LEAKAGE, ENVIRONMENTAL, or SPILLS and this is where you report the quantity of the emission. If the classification has attributes, then you can also enter the specification details. When reported against a location, the Locations (HSE) application will show these in the action View Fugitive Emissions.
For continuous or regular emissions, you can use the Locations (HSE) application and a meter, there is an Emission Details section, this used to be called Environmental Consent. The Environmental Monitoring toggle needs to be set for it to appear in the View Continuous Emissions action. Emissions are supported with all meter types, but a continuous meter will normally be used, a gauge meter reading might be used for water quality, a characteristic meter doesn’t have a unit of measure and is therefore unlikely to be used. The new emission fields include a classification but the Use With Object in this case is LocationA physical place where assets exist and where work can be performed. More MeterA Meter is an identifier for recording meter readings, measurements and observations on assets or locations. More (LOCATIONMETER), but the same set of classifications can be defined for multiple objects. There is no ability to enter the specification values and I have raised an IBM Idea for this – https://ideas.ibm.com/ideas/MASHSE-I-13 – Emissions Management – Location Meters – To be able to enter Specification Details for continuous emissions as you can do for fugitive emissions. You enter the CO2 equivalent amount from the View Continuous Emissions dialog. There is no change to the Enter Meter Readings dialog.
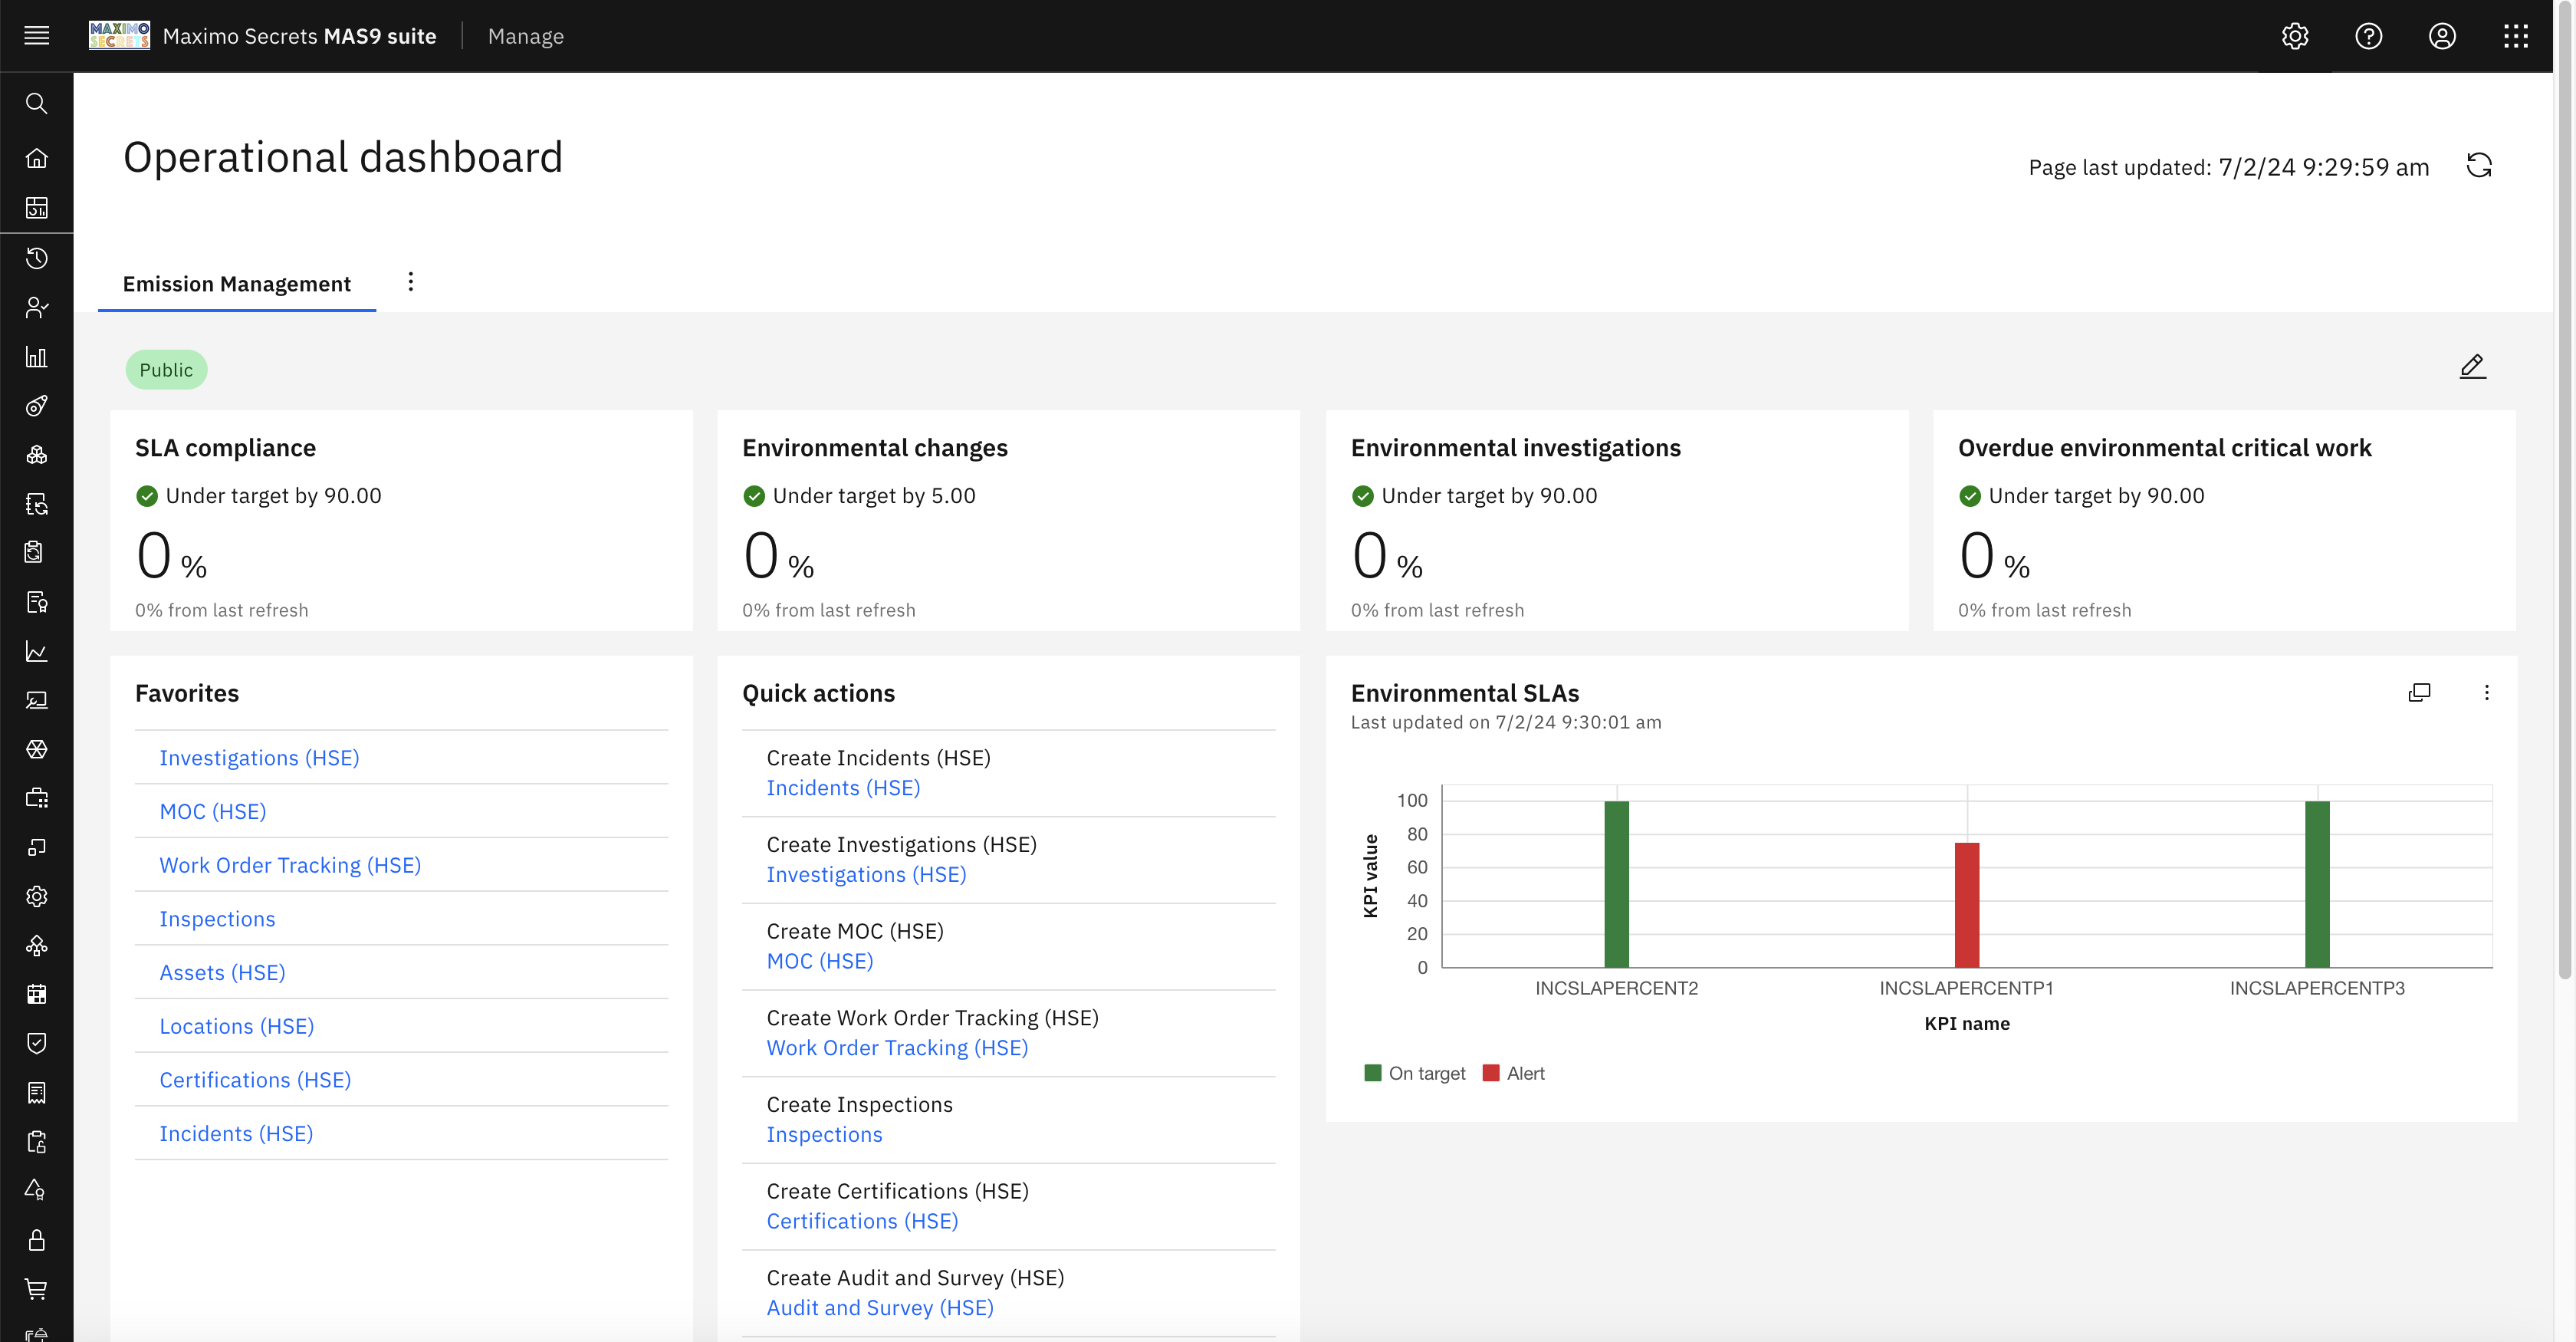
The Emissions Management dashboard is a tab on the Operational Dashboard, and it provides four KPIs, SLA Compliance (INCSLAFUGITIVE), Environmental Changes (COUNTPLUSGMOC), Environmental Investigations (ENVINVESTIGATION), and Overdue Environmental Critical Work (EMWOSUPEDENCRIT). Other tiles include Favourites, Quick Actions, Environmental Incident SLA Comparison and Environmental Work Queues.
There are several HSE/O&G applications that support environmental leaks:
- Leak Events – Incidents, Investigations
- Leak Remediation (short term) – SR, Work Order Tracking, Action Tracking
- Leak Remediation (long term) – Improvements, MOC Request, MOC
- Leak Surveys – Inspections, Work Order Tracking, Regulatory Compliance, Audit and Survey, Certifications
- Leak Profile – Locations, Assets
HSE and O&G support a wide range of additional environmental use cases, including risk and impact assessments, permit and consent management, emission profiles, hazardous waste management, etc.
Formulas

There is a new application called Formulas found in the Systems Configuration module. This is a role based application built with the new Maximo Application Framework (MAF) tooling. The Formulas application allows you to create Object and Attribute formulas, the same formulas that you can also create from the Database Configuration application actions. It is provided as its own application because formulas in Maximo need to be created by users who should not have access to Database Configuration.
When creating an Object Formula, you provide the Object Name, a Formula Name, and the Description, then you create the Formula Expression. Object Formulas work against the record (MBO). During edit, you can just change the description and formula expression. To delete a formula, highlight the table row and the trashcan button will be displayed on the right, a confirmation message will be provided.
When creating an Attribute Formula, you provide the Object Name, Attribute Name, and a Description, then you create the Formula Expression, and specify whether it should be calculated asynchronously via an escalation. Attribute Formulas work with both persistent (database fields) and non-persistent attributes, but you need to make the formula active. There is no restriction on the attributes that you can select although numeric, duration and date types should work, attributes with upper and ALN data types are not suitable for formulas. You can edit and delete attribute formulas from the buttons on the right of the table.
There is no lookup on the formula field. It will take time figuring out anything other than basic formulas but there are two documents to support this https://www.ibm.com/support/pages/ibm-maximo-manage-formula-documentation
The Add/Modify Formula Function action remains in the Database Configuration application, as does the ability to build a conditional formula, neither exists in the new Formulas application.
Reliability Strategies

Maximo Application Suite (MAS 8.11) introduced the Reliability Strategies application, an add-on that needs to be installed. This provided access to 58000+ failure modes for 800+ asset types and included their mitigating activities, the whole being developed by experts over many years.
In MAS 9.0 there is a new tab called Custom Strategies which allows you to create your own Reliability Strategy records. You pick an Asset Class and an Asset Subclass, enter an Asset Configuration and provide a Strategy Name that becomes the unique key. In the dialog for selecting an Asset Class there is a button Create Asset Class, similarly in the dialog for Asset Subclass there is a button Create Asset Subclass.
There are three tabs, Overview, Failure Modes and Tracker.
The Overview tab has additional fields to define the source of the strategy data and allows you to reference the team members involved. It then sets the scene with the Strategy Details with textual fields for Business Drivers, Data Analysis Needs, Boundary, Asset Function, and Asset Functional Failure. The Operating Context is three pairs of textual fields for you to define Criticality (Critical, Minor), Duty Cycle (High, Low), and Service Condition (Severe, Mild). All the fields are provided with help text.
In the Failure Modes tab, you can select existing Failure Modes or create one from a blank template. The failure mode details include the Component, Failure Mechanism, Failure Influence, Failure Effects and Failure Consequences, all of these are text fields. You then add a Risk Priority Number (without parameters), this is before taking any actions to mitigate the failure mode, you can alternatively calculate a Risk Priority Number using the parameters Severity, Probability of Occurrence, and Detectability.
The mitigating action types might be preventive maintenance, inspection, condition-based maintenance, training, spare parts, or redesign. For each action you would enter whether it is a single or recurring action, the action comments (description), whether it is interval or meter based, the recommended interval, a frequency comment and the effectiveness of the action, low, medium or high. Once the action is created you can choose whether to track it.
The same parameters are available for the Risk Priority Number expected after performing the actions, the Final RPN. The Failure Mode page is completed by selecting the Stressors, the operational or environmental conditions that initiate a failure, or accelerates the time to failure. There are also fields for Discovery Opportunities, Estimated First Failures, Repair Time and a selectable Functional Failure Mode.
The Custom Reliability Strategy starts life at Draft status, moves to Ready for Review and then Complete status. The team members are free text fields and not selectable from Maximo Manage person records, a pity that this is not an option.
The Tracker tab will be read-only until the custom reliability strategy has reached Complete status. At Complete Status the fields in the Overview and Failure Modes tabs will be read-only. The Tracker tab has two tabs Tasks and Recommended Actions, these are the actions that you had entered on the Failure Modes tab.
In the Tasks tab you add tasks against Maximo assets which may come from different sites, multiple assets can be selected in one action. Against each selected asset you select an Owner, Due Date, Comment and Status (New, In Progress, Complete). The Owner field in this case is using Maximo Manage People records.
There are actions to Duplicate or Delete a Custom Reliability Strategy. There is also the ability to import FMEAs, but I could not validate this as at the time of writing the RedHat Market Place is not yet available in the UK.
When you look in the Database Configuration application to begin to understand the data structures, you’ll find just four objects for the Service RSSTRATEGY and none that will store the FMEAs. This is because they are not stored locally in the Maximo Manage database but in the cloud. When I checked I received this reply from the Product Designer – “data is stored in a separate library dedicated to that client. It is not shared.”. This does raise in my mind a lot of questions, involving how to import/export, how to configure with additional fields, and who owns the Intellectual Property of the completed RCM study. Hopefully I’ll get an answer to these over the next few weeks.
We do not yet have integration with the rest of Maximo, PM’s, Job Plans, Inspections, Meters, etc, but I expect that will be on the roadmap. The challenge will be how to do this in a way which doesn’t become an administrative burden, considering that you may have many assets that share the same RCM study, which is updated based on feedback from the technicians who are performing the maintenance. How do you update the strategy in one place and allow this to modify multiple Maximo records that are based on it?
Scheduling Dashboard

The Scheduling Dashboard was first introduced in Maximo Manage 8.5 (MAS 8.9) and it was enhanced in Maximo Manage 8.6 and 8.7, but I do not believe it was modified for MAS 9.0. It is my first look at the application, hence why I have included it here.
The Scheduling Dashboard has four KPIs for Scheduled, Scheduling Issues, Resource Utilization and Total Resources. Below this is the schedules created in Graphical Scheduling (GS) application where the action Prepare for Dashboard has been used, this defines the scenario and optimization template to use. The option to Add Schedules takes the user to the Graphical Scheduling application.
The Scheduling Dashboard is designed to use the Optimizer to create a set of schedule dates for your work orders, based on the available crafts and crew types. When you navigate into a Schedule a new display appears with three tabs:
[To create nice pictures, you need to create a lot of work orders, I have just 5 work orders, I probably need to create >100!!]

Resource Utilization shows a day-by-day schedule of the crafts, crew types and tool items (still to validate). There is hover over text on each cell showing the hours scheduled, hours available and percentage resource utilization. The percentage utilization is used to colour the cells as shown in the legend, red for over 100%, yellow for less than 80% and three shades of green between 80-100%. In the picture we are 94% utilized on 9th July 2024. If you click on a cell it takes you to the Resource Leveling tab.

Resource Leveling shows a day-by-day schedule of the work orders for a resource, in this case Mechanic. There is minimal data in the cell which shows the priority, planned labor hours, and work order status, there is no reference to the work order number or asset.

If you click a cell, you can modify the Priority, Duration, Scheduled Start and the two constraint dates. Note that you are not changing the craft hours, the work effort.
Scheduling Issues is a tab that shows work orders that cannot be optimized, providing the reason why. For example, not enough resources available to schedule this work. The table allows you to change the Duration, Start No Earlier Than, Finish No Later Than dates, Priority, Interruptible and Interruptible Shift, you can rerun the optimization.
The three actions are Refresh Schedule, Optimize Schedule and Publish Schedule. The Optimize Schedule opens a page with the different constraints and variables that can be applied, for example whether to match craft and skill level, or to respect the start not earlier than and finish not later than constraints. As the optimizer starts processing an optimization report opens showing you the status, any alerts, and a summary. There is a button to run the optimizer in the background and another to stop the optimizer processing.
Dispatching Dashboard

The Dispatching Dashboard was introduced in Maximo Manage 8.7 (MAS 8.11) and it has four KPIs for Assignments, Total Resources, Emergencies and Resource Utilization. Below this is the schedules created in Graphical Assignment (GA) application where the action Prepare for Dashboard has been used, this defines the scenario and optimization template to use. The option to Add Schedules takes the user to the Graphical Assignment application.
The Dispatching Dashboard is designed to use the Optimizer and assign work against already scheduled work orders. When you navigate into a Schedule a new display appears with three tabs:

Gantt Chart shows the list of resources, but initially the Gantt chart will be blank until you use the action Optimize Schedule. This opens a dialog with all the Optimization Settings and from here you can run the optimizer. When the optimization engine has started processing the optimization report opens. After it completes the Gantt Chart will be filled with work assignments that have been automatically assigned to labor or crews based on the optimization settings you used. The bars in the Gantt Chart are colour coded based on the assignment status, which now includes Accepted and Rejected, a change made in the Maximo Mobile Technician application. New in MAS 9.0 is a button on the left which opens a map, but this is currently quite basic. There are also hover-over details for the work order.
You are working in a scenario, a copy of the GA Schedule, you may run the optimizer multiple times but when you are happy with the assignments and the resulting schedule you use the action Publish Schedule. I did find and report an issue when this is performed on work orders without a service address, but later with service addresses and labor records with a start and end location I found that I could use the action Publish Schedule successfully.
Emergency Work is new in MAS 9.0 and uses the definition created in the GA action – Define Emergency Work and shows a list of the work order assignments that you consider should break into your schedule. When you click on the work assignment the right-hand side of the screen shows the resources that could be assigned, their estimated start time and estimated travel time. When you pick a resource, you can make the assignment.
Assignment Issues is a tab that shows work assignments that cannot be optimized, providing the reason why. For example, I removed a service address from one work order, used the action Refresh Schedule followed by the action Optimize Schedule. The Optimization Report highlights the MissingAddress and in the Assignment Issues tab there was one record with the error message – SERVICEADDRESS – This work order has no service address or service address is not included in time travel matrix. Some fields in the table from the WOASSIGNMENT object can be updated, and the changes saved, but not the Service AddressA Service Address is a postal address and/or a record that positions a point on a map. More.
The Dispatching Dashboard includes navigation to the new Work Orders application from the Emergency Work – Assigned View.
Graphical Work Week and Graphical Resource View

The Graphical Work Week and Graphical Resource View both have a new field Start Week Day which can be set to any day of the week, for example MONDAY.
KPI Manager Endpoint

There are two new fields added to the KPI Manager application in the Endpoint Details section. End Point allows you to select a record defined in the Integration – End Points application, and Expression has the field help – Expression for evaluating endpoint response.
The documentation also provides this – You can specify an endpoint instead of a KPI query to obtain data from external sources, for example, from Maximo Monitor. The Expression helps you to plot a graph that draws data from external sources. How you achieve this, is another matter, an example would be useful.
Inspection Forms

The Inspection Forms application is a role based application which replaces the Manage Inspection Forms Work Center, it will be found in the Planning module. Evidently the new application has the same functionality as the old one, which had the following capabilities:
- A form type that included Audit, Condition Assessment, Inspection, Investigation, and Round.
- Ability to enter a Form Instruction with rich text formatting.
- Add multiple questions with response of type, Date only, Date and time, File upload, Meter readings, Multiple choice, Multiple choice domain, Single numeric entry, Signature, Single choice, Single choice domain, Time only, and Text response.
- With Single Choice and Multiple Choice, the responses can have an associated icon and colour, and whether the response will result in an action.
- Questions can be mandatory or optional and you can add extra information to support the question.
- Questions can be grouped together.
- Questions can be conditional based on the response of a previous question within the same question group.
- Questions can be reordered using the drag button.
- Inspection forms start at Draft status and can be made Active or Inactive.
- Inspection forms are under revision control you modify by using the Create Revision button.
- You can preview an inspection, duplicate it and view a revision history. It is from the Revision History where there is a button to Create Revision.
- For an inspection being revised you have options for Conditions, Edit, Delete, Form Settings and Preview. It is in Form Settings where you specify a script to run, for example to create a follow-up work order.
- When inspections are conducted you can view the Previous Results of the same question on previous inspections.
- For questions with numeric responses a validation rule can be entered, for example to ensure a value is within range (MAS 8.8).
- The system property mxe.mobile.inspection.features.enablereview can be used for a supervisor review status to occur between In Progress and Complete (MAS 8.9).
- The inspection supervisor can see whether a field was visible or hidden during the inspection (MAS 8.9).
- For the File Upload response, a user can enable the analysis of the photo by Maximo Visual Inspections (MAS 8.10).
Note – Voice Assisted Inspections are no longer available as the IBM Watson services that came with Maximo Assist is no longer available.
AI Configuration

Much of the hype in Maximo Application Suite (MAS 9.0) has been the addition of AI. Elements of AI have been included in Maximo Application Suite for a few years now, Maximo Predict and Maximo Visual Inspections both use AI models that need to be trained with data. Maximo Assist also used AI, but this has been scaled back in MAS 9.0 (see later section).
To support AI in the future a new application has been created AI Configuration, you will find it in the Administration module. There is just the one record WOPROBLEMCODE. The Add Configuration button would allow you to create another record, but you need first to have a license for watsonx. You can start with a free trial which is limited to 50000 tokens/month, hopefully enough to test or demonstrate, a subscription to the Essentials tier will be required for production. You will also need to update three System Properties for the AI Broker mxe.int.aibrokerapikey, mxe.int.aibrokerapiurl, and mxe.int.aibrokertenantid.
There are actions on the right for Activate, Deactivate and Delete. Also, a button Check Model Status.

The Add Configuration dialog has similar fields to that which you can see in the top half of the screen showing the details of the WOPROBLEMCODE AI Configuration. There are also a set of actions Activate, Edit, Check Data Requirement, Clear All Inference, and Set Arguments.
Work order problem codes are often left blank, or the technician enters the first value or if it is available to be selected OTHER or UNKNOWN. Maximo Manage now uses AI to help a technician to select a Problem code based on what they have provided in the short and long description of the work order.

You do need “good” work order data with problem codes to train the model, and the ability to periodically retrain the AI model with a new set of data. The Problem Code Classifier (PCC) model will predict the top three problem codes with a level of confidence based on a description of a work order.
The Work Orders role based application has two actions that can be used against multiple work orders; Add to AI training model, and Remove from AI training model. This is believed to be updating the field AI_USEFORTRAINING. It is not a field that you’ll find in the Work Order Tracking application, but I’m assuming it can be configured.
If AI has been enabled, below the Problem Code field in the Edit page of the Work Orders role based application you’ll find the recommendations provided by the AI model, you can either select an AI recommended Problem Code or one of the others associated with the Failure ClassA Failure Class is the top-level Failure Code of a Failure Hierarchy. More.
Next step is to obtain a license and have it installed.
Maximo Assist
Maximo Assist also used AI models but a large part of it no longer exists as Watson Discovery has been removed. This provided document query and diagnosis services as well as the voice-based inspections.
The good news is that the collaboration functionality where a technician can contact an expert and use the camera on their mobile device with the expert annotating what they see to help guide the technician, this is still available. The AppPoints used when Maximo Assist was installed is no longer relevant, no AppPoints will be deducted, and users operating from a Limited license can also use the collaboration features.
Other Deprecated Features
- Work Centers – All the work centers have now been deprecated. The three remaining work centers after the release of MAS 8.11 were:
- Manage Inspection Forms replaced by Inspection Forms
- Manage Inventory replaced by Issues and Transfers
- Manage Monitoring Information replaced but retained the same name
- Digital Twin Exchange is no longer supported
- Spatial – Support for Bing Maps and Google Maps as map providers is replaced by OpenMap.
- Maximo Anywhere became unsupported since MAS 8.9
Leave a Reply