
Last Updated on October 29, 2023 by maximosecrets
Contents
This is the second in a series of articles on the Graphical Work Week application. It will cover the List and Work tabs and the actions menu; it will also show how the work and resource queries result in the records shown in the Graphical View tab.
List Tab

The List Tab shows the Work Lists created in the Graphical Work Week application. These records are based on object/table SKDPROJECT and so are shared with the other Maximo Scheduler applications. The unique key is based on the Work List (NAME) attribute, this has to be unique across all the Scheduler applications and so a convention might be warranted, for example WW – Work Week. If you use a name that exists elsewhere you will receive the error message “The project name SCH01 already exists. Choose a unique project name. (BMXAA9220)”. The object SKDPROJECT exists at the System level.
The fields in the List Tab are as follows:
- Work List – the unique identifier, defined with a type of UPPER, 20 characters long.
- Description – it has a long description field
- Last Saved Date – date and time when the work list was last saved
- Calendar – the calendar used by the work list, there can be only one per work list
- OrganizationA structural element of a Maximo database which is used for data sharing. More – the organization populated from the selection of the calendar
- Rolling Project – identifies whether the work list is a rolling work list (see later)
- Created By – the person who created the work list.
There are two actions.
Action – Create Work List from Schedule

The action Create Work List from Schedule provides a list of projects found in the Graphical Scheduling application, plus one other called MYSCHED. The action allows you to use the definition from another Scheduler project to create the definition for a Graphical Work Week work list. You cannot use the definition from a Graphical Scheduling – Large Projects schedule, only the schedules found in the Graphical Scheduling application.

When selecting MYSCHED the work query OWNER IS ME – My Work Orders, is copied, along with calendar information and a Start and End Date of 28-Jul-2018, which would be more useful if it was the start and end of the current month. You will need to add a Work List name before saving, I used WW002. Unless you happened to create some work orders at exactly 09:25 on 28-July-2018 if you went into the Graphical View tab you would find no work orders displayed.

I changed the Start Date to 01-July-2020 00:00 and the End Date to 31-December-2020 23:59 and saved. Now the Graphical View shows some work orders and resources. Notice, if the duration of your work orders is 0:00 then you will get a diamond instead of a bar. If you include tasks that are short in duration then you will get a bar, that appears as a line that is hardly visible, you may want to exclude tasks, especially if you resource at the work order level, you can do this from a setting on the work order rather than in the work query.
The query My Work Orders, OWNER IS ME is the query name, has the following condition “reportedby = (select personid from person where personid = (select personid from maxuser where userid = :USER ))”. It is a standard query you can find in the Work Order Tracking application and it resolves to find all the work orders that you have created. Notice the bind variable :USER resolves to the logged in person, which happens to be WILSON in this case.
Action – Create Work List from Graphical Assignment

The action Create Work List from Graphical Assignment provides a list of projects found in the Graphical Assignment application, and similar to what we have just seen allows you to use the definition from another Scheduler project to create the definition for a Graphical Work Week work list.

I’ve called the new work list WW003 and then saved the record. The Start Date and End Date were copied from the Graphical Assignment project A1001 as were the Work Queries and Restrict Resource Availability queries.
Work Tab
The Work List name as already discussed is the unique identifier across all Maximo Scheduler projects. The menu to the right of the field (>) has one option – Go To Scheduler Data Manager. This was also a new application in Maximo Scheduler 7.6.8 developed to help clients find common validation issues in the data used by the Maximo Scheduler applications. For Graphical Work Week this will validate the Calendar, Queries and the Assignments.
The description field has a long description.
The Calendar, Shift and Organization are mandatory fields although the shift will not be found to be mandatory until you attempt to save a new work list and receive the error message “BMXAT1070E – A shift is required.” When you select the calendar from the Select Value the Organization field will be filled, this is the calendar’s organization. One or more Shifts can be selected, this ought to be from the set where work periods have been created for the calendar, but there does not seem to be a validation on this. The calendar defines which days are work days and which are non-work days. The shift defines what hours are work hours from those which are normally non-work hours.
The Start Date and End Date will be used in the query that selects work orders and assignments into the top part of the Graphical View, the Work View. For a new work list this defaults to today for the Start Date and two weeks’ time for the End Date, at the time of writing 16-December-2020 to 30-December-2020 with the time element in both cases as 00:00. Although the Work View only shows one week at a time, the Duration in Days should always be at least 14 days. The reason for this is that it would allow you to move assignments to a later week if the resource load was greater than the resource availability.

The Start Date and End Date filters work orders, tasks and work assignments according to whether the Scheduled Start falls within those two dates. The check box “Includes Work Orders Without Dates” when set will include any work orders where there is no Scheduled Start Date. You will receive a message when you check this field “When adding work records in the graphical view without any dates, a schedule start date will be created in the Work Order Tracking application. (BMXAT1110)”. When you press OK Maximo adds:
- A Schedule Start date to a work order with no task
- A Schedule Start date to a task and also its parent work order
In all cases the Scheduled Start date is date/time now. The Scheduled Start date on the work assignment is not updated.
The check box “Refresh When Opening Gantt View” determines whether to automatically query and refresh the schedule data every time the Graphical View tab is opened, and it activates the Gantt based work view. If this is left unchecked, then the user should periodically use the Refresh Work List action which they should do when the Graphical View tab is open. Refreshing the work list pulls into the Graphical Work Week any changes made to existing work orders that may have been updated in Work Order Tracking, or other Maximo applications, it may remove some work orders and assignments if they no longer fulfil the query criteria, and equally they may pull in new emergent work.
When you save changes in the Graphical Work Week application, they immediately update the records in the Maximo tables, you do not need to commit your changes back to Maximo as you do in the Graphical Scheduling application.
Rolling Projects
The four fields starting with the check box “Rolling Project?” allows you to have a rolling Start Date.
- Roll Dates in Schedule – determines the frequency at which the Start and End Date are recalculated. Default is every day, but it might be every week on a Monday at 05:00, for example.
- Duration in Days – Is the number of days between the Start Date and End Date, the default is 14.
- Rolling Offset in Days – default 0, this allows you to offset from today the Start Date.

The Roll Project action is used to immediately roll the project or set a recurring schedule or to roll the schedule at a particular date and time. When the radio button is set to “Recurring”, an instance will be created in the read only Cron Task ROLL. When the radio button is set to “At this Time”, an instance will be created for the read only Cron Task ROLLT. When you roll the project Maximo will refresh the work orders in the work list pulling in new work orders to be scheduled and removing those that do not meet the work query criteria.

I used the radio button option Immediate, today is the 17th December 2020, which would normally then be set as the Start Date and then used the Roll button. I had set the Rolling Offset in Days to -7, hence Start Date is 10th December 2020. The Duration in Days of 21 is then calculated from this Start Date to derive the End Date of 31st December 2020.

I also want the project to roll every day from now on and so have used the action again and this time selected the Recurring radio button, selected an everyday frequency (1d,0,0,0,*,*,*,*,*,*), added an email address, which is a mandatory field, this time I used the Save button.

In the Cron Task Setup application you will be able to find the Cron Task called ROLL, note you will need to remove the Access Level filter of FULL as this is a READONLY cron task. There is now an instance created when you saved the Recurring Roll Project action, it has the parameter to indicate the work list name of TEST02. There are no scenarios for Graphical Work Week.
We’ll see what happens in a few days’ time after the Cron Task has run, if it were tomorrow the Start Date should move to 11-December-2020 and the End Date to 01-January-2021.
Postscript – on 21st December 2020 the Start Date is now set to 14-Dec-2020 00:00 and the End Date is set to 04-Jan-2021 00:00, it has rolled four times.
Work Queries

Returning to the Work List WW002 which we created using the action Create Work List from Schedule. The work query has a:
- Query Name – This is the name of the query related to the Work List WW002, the same query name can exist in multiple work lists.
- Description – This is the description of the query, its purpose, you may add a long description to explain the query further.
- Where Condition – The SQL where condition that will be used to query from the table that contains the records, in this case it will be WORKORDER. The detail menu gives you access to the SQL Expression Builder or the Quick Query Builder.
There are three methods for creating a query:
Copy Query – This is my preferred method. It will provide a list of the saved queries that have been made in the work order based applications like Work Order Tracking (WOTRACK). The query and its where clause are copied to the Work List record, it is now independent of the original query, either can be updated and they would not have an effect on the other.

The Quick Query Builder looks like the Advanced Search found in the Work Order Tracking application, and it has a section for Dates and Address Information if you vertically scroll down. It isn’t the same dialog as that found in the Work Order Tracking application, it is unique to the Graphical Work Week application. This would be configured in Application Designer for the application GWORKASSIGN. You will find several dialogs with a name starting with “quickquery”, the one related to Work Orders is “quickquery_wo”.
It is nice to have, but it is more difficult to evaluate the query results in the Graphical View tab than it would be by using the List Tab of the Work Order Tracking application. The results of the query shown in the Graphical View will be work assignments that belong to work orders and tasks, not just the work orders which is the result of a query made in the Work Order Tracking application. Therefore, you could end-up with many times more records as you would do if you were making a query in the Work Order Tracking application, making it harder to evaluate that the query is correct. Hence why I prefer to get the query right first and save it in the Work Order Tracking application before copying it over to the Work List using Copy Query.
Remember that the query you make in the Work Order Tracking application should not filter by Schedule Start date because the Start Date and End Date on the Work tab will do that for you.

For complex queries you can use the SQL Expression Builder.
You can have multiple work queries, when you do there will be a logical OR between the where clauses. The queries are based on the WORKORDER table and will include work orders that have no assignments. You can create the assignment in the Graphical View. The Graphical Work Week will exclude work orders that are at a status of CLOSE or CAN, even if your query does not exclude them.
If you create a new work list and you have no Work Query or Restrict Resource Availability query and the Include Work Orders Without Dates is unchecked, then when you go to the Graphical View tab you may still see work orders. These are work orders where the Scheduled Start Date is between the Start Date and End Date on the work list.
Restrict Resource Availability

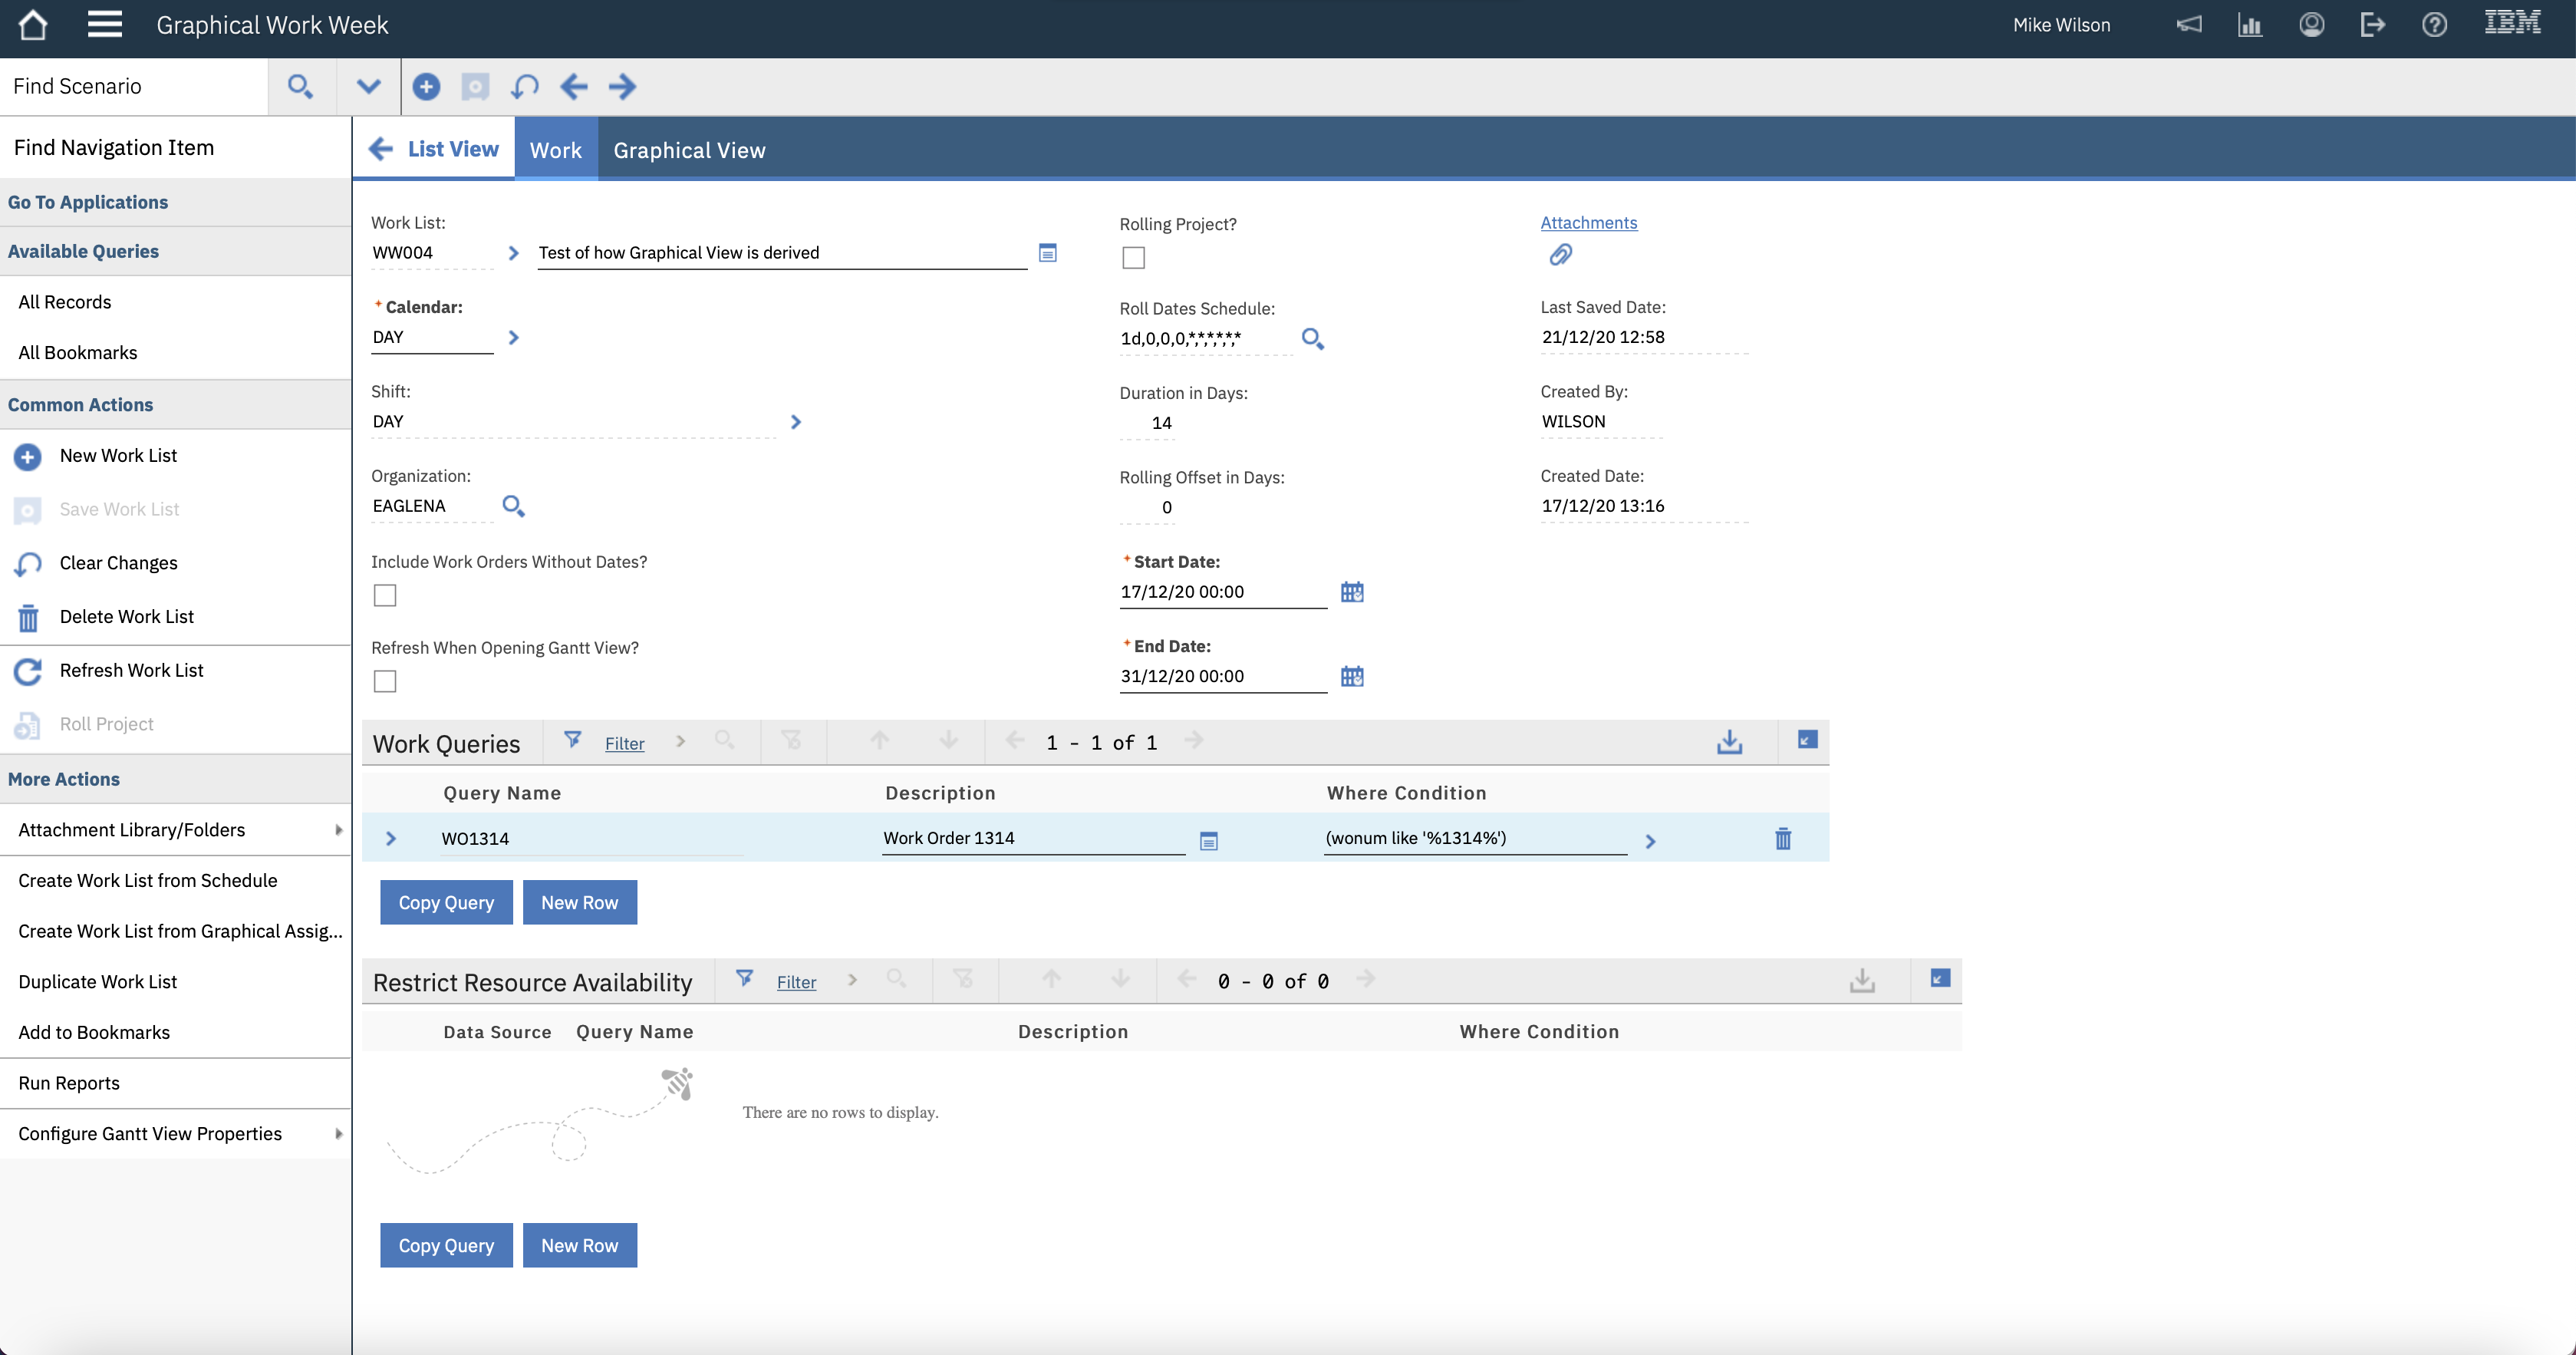
I’ve created a single work order, in my case 1314, with requirement for craft ELECT – Electrician for 4 hours and a Scheduled Start date of 17/12/20 13:25. This Scheduled Start Date is between the Start Date and End Date. I’ve then created a Work Query and used the Quick Query Builder to select work order 1314, there is no query for Restrict Resource Availability.

When you go into the Graphical View tab, for me the Resource View is initially empty there are no resources or resource cells. By using the Next Week button, the message “Refreshing Resources” is displayed for a short time and the cells are displayed but not for a Sunday. The Maximo system I am using is Maximo 7.6.1.2 and Scheduler 7.6.8 with IFIX003 applied, same as the Scheduler Demo environment which seems to be OK. Over the last couple of weeks, I’ve not been able to track down the reason for this and it is now with IBM Support, we think it might be something to do with time zones. IFIX004 has now been applied, it made no difference.
As you can see there is only the one assignment for the 4 hours of an Electrician. The Scheduled Start date of 13:25 will place some of the duration of the assignment in non-working time. The DAY shift finishes at 15:00 and so 2:35 of the assignment is in non-working time, although it is difficult to see this, it would be a little easier to see if there were more work orders.
The Resource View shows the resources whose default craft is included in the work assignments of the work query and whose calendar and shift is the same as that entered for the Work List, DAY/DAY in this case, 18 electricians in all.

I’ve now added a LABOR query to the “Restrict Resource Availability” table window, to restrict labor to the NEEDHAM work locationA physical place where assets exist and where work can be performed. More.

The Resource View is now restricted to the 5 labor that have NEEDHAM as their work location, and which have a default craft of ELECT and who use the DAY/DAY calendar and shift.
Currently the Resource List is based on the default craft of the labor being a match to the craft requirements on the work orders or work assignments referenced on the work list. This means that a labor who has a secondary craft of ELECT could not be assigned to this work order.

I’ve added a Carpenter requirement to work order 1314, so we now have two work assignments, the carpenter is only needed for one hour. In the Work View it is now a little more obvious that some of the Electrician work hours overlap the grey area that indicates non-working time.
In the Resource View I’ve used the button “Collapse all rows” to focus in on the two crafts. On the 17th December 2020 you can make out the load of 1:00 hour of a Carpenter and 4:00 hours of an Electrician. In both cases there is availability of 40:00 hours of each craft for this day, 5 Labor of each craft where the craft is defined as their default craft.

With the ELECT work assignment selected the CARP – Carpenter resources for GRANGER and SCHAFER are also highlighted. These two labor have CARP as their default craft but they also have ELECT – Electrician as a secondary craft.
Notice that there are two shades of the highlighted resources (Turquoise). The darker shade is a perfect match to the resource requirement, a lighter shade is a close match. This differs depending on whether the work assignment requires a craft, a craft with skill level or a crew, it is addressed in detail in the 4th article, Graphical Work Week – Assignments.

With the Electrician work assignment selected, if you double click a cell you can make an assignment. In this case we chose GRANGER and 17th December 2020. The Assign Labor dialog appears for you to confirm. Notice the Scheduled Start will be modified to the earliest time that GRANGER can perform the work. Today is 21st December and the DAY shift is now over, hence the Scheduled Start is tomorrow, 22-December-2020 at 07:00.

If we use the Next Week button, we can now see the work assignment has change status to ASSIGNED, the percentage allocation for GRANGER has changed to 10% for the week, which is 4 hours of a possible 40 hours assigned. GRANGER also shows 4:00 hours remaining to be assigned on the 22nd December 2020.
The resource view shows the labor that has the default craft of the work assignments, but it allows an assignment to be made against the secondary craft of those labor resources. However, unless you select a sufficient number of work orders with varying resource needs, you may not be able to find the Labor where they match to the craft requirement by using their secondary craft.
Both the Work Queries and Restrict Resource Availability table windows allow you to specify multiple queries. The Restrict Resource Availability allows you also to query with a data source of AMCREW (crews).
Delete and Duplicate
There are two actions available from the Work tab:
- Delete Work List – will require your confirmation before proceeding. You can only delete one work list at a time.
- Duplicate Work List – will duplicate the work list fields and queries but the Work List field will be empty for you to add a value before saving the record.
Leave a Reply