
Contents
Inventory Receiving is a Maximo Mobile application which will also be found on the desktop in the Inventory module and Role Based Applications. There may be some differences between the two and I aim to uncover those differences. Maximo Mobile aims to be an offline solution, the Role Based Application performs the same functions, but it may have additional capabilities which require to be online, we will see.
This is the article on the Role-Based Application – Inventory Receiving and the screenshots have been taken with an iPad in landscape mode. The article will cover more details than the Maximo Mobile article for Inventory Receiving which will be focused on an end-user, for example, this article will also review the Object Structures and Queries that support the applications.
I had originally aimed to write about the whole of Inventory Receiving (RBA) but it really has two parts. This article is the first part, the Inventory Receiving option which in desktop Maximo is the Receiving application and the Material Receipts tab, and not the Service Receipts tab, which is not covered by this application. Next week I will start writing the other part which is Shipment Receiving which is the receiving aspect of items that start out on an Inventory Usage record of type Transfer. The environment I am using is MAS 8.11.0 and Maximo Manage 8.7.0.

When you launch the Inventory Receiving Role Based Application there are two options, Inventory receiving and Shipment receiving. In both cases you might get a message like “No storeroom configured for this user” or an informational message with a blue background “Please set default storeroom for the login user in Maximo.” The user needs to have configured a storeroom in the field Default Storeroom for Self-Service Requisitions which will be found in the user’s Profile – Default Information. I have set the user WILSON to the CENTRAL storeroom of the BEDFORD site.
Receive Storeroom Item

The Inventory Receiving option shows the one query Open POs and this query is made against the storeroom marked as the Default Storeroom for Self-Service Requisitions, in my case it is the open POs of the CENTRAL-BEDFORD storeroom. It would be possible to have multiple queries defined.
The Open PO query showed 14 records, ordered by PO Number. This is a query that could be made in the Receiving application, but it is not the default query which shows all POs. This is restricted to POs where a PO line references the storeroom and POs where the Receipts Status is NONE or PARTIAL, it does not show POs where the Receipt Status is COMPLETE.
There is no PO status field as to receive all POs are likely to be at APPR (Approved) state. The Receipt Status is shown, No Parts Received (NONE), or Some Parts Received (PARTIAL).
There is a button to Check for updates, and next to it a button to perform a search. Each PO record shows the PO Number and its description, and below this the Ordered Date, the Vendor and the Vendor Name. There is some text to indicate the number of PO Lines and below this a series of buttons which are from left to right Receive, Inspect, Create Assets, Return, and Receipts. Many of these buttons will remain disabled until there is the context to enable them.
Note. When looking at the application code I also found that the POs Ship To Attention (PO.SHIPTOATTN) is also displayed, positioned between the Vendor and the number of PO Lines. This is the identifier and not the display name of the person.

The search button opens a search bar which can be used to search for any text on the PO fields displayed, which in this case is the PO Number, Description, Vendor and Vendor Name. You can also search on the Receipt Status by searching using the words None or Partial. A search by the text ‘No Parts received’ is successful but ‘Some Parts received’ will not return any records.
The search bar has a scanning option, which opens the camera and transfers any interpreted barcode number to the search bar so that a query can be performed. This would work if the package contained a barcode of the purchase order number.
In the screenshot I have chosen the Vendor called Kennedy and will now perform the search by using the tick button on the right-hand side.

The result is three POs found for vendor KENNEDY. The button at the right-hand side now shows a button with a cross to Clear the search input text.

I have returned to the original Open PO Query and selected the first PO 1017.
At the far right of each PO record is a chevron button (>) which opens a page with a similar set of buttons to those below each PO record but with the addition of Void. On some of the rows there may be an indicator of the number of records, in my case there is one PO line to receive.

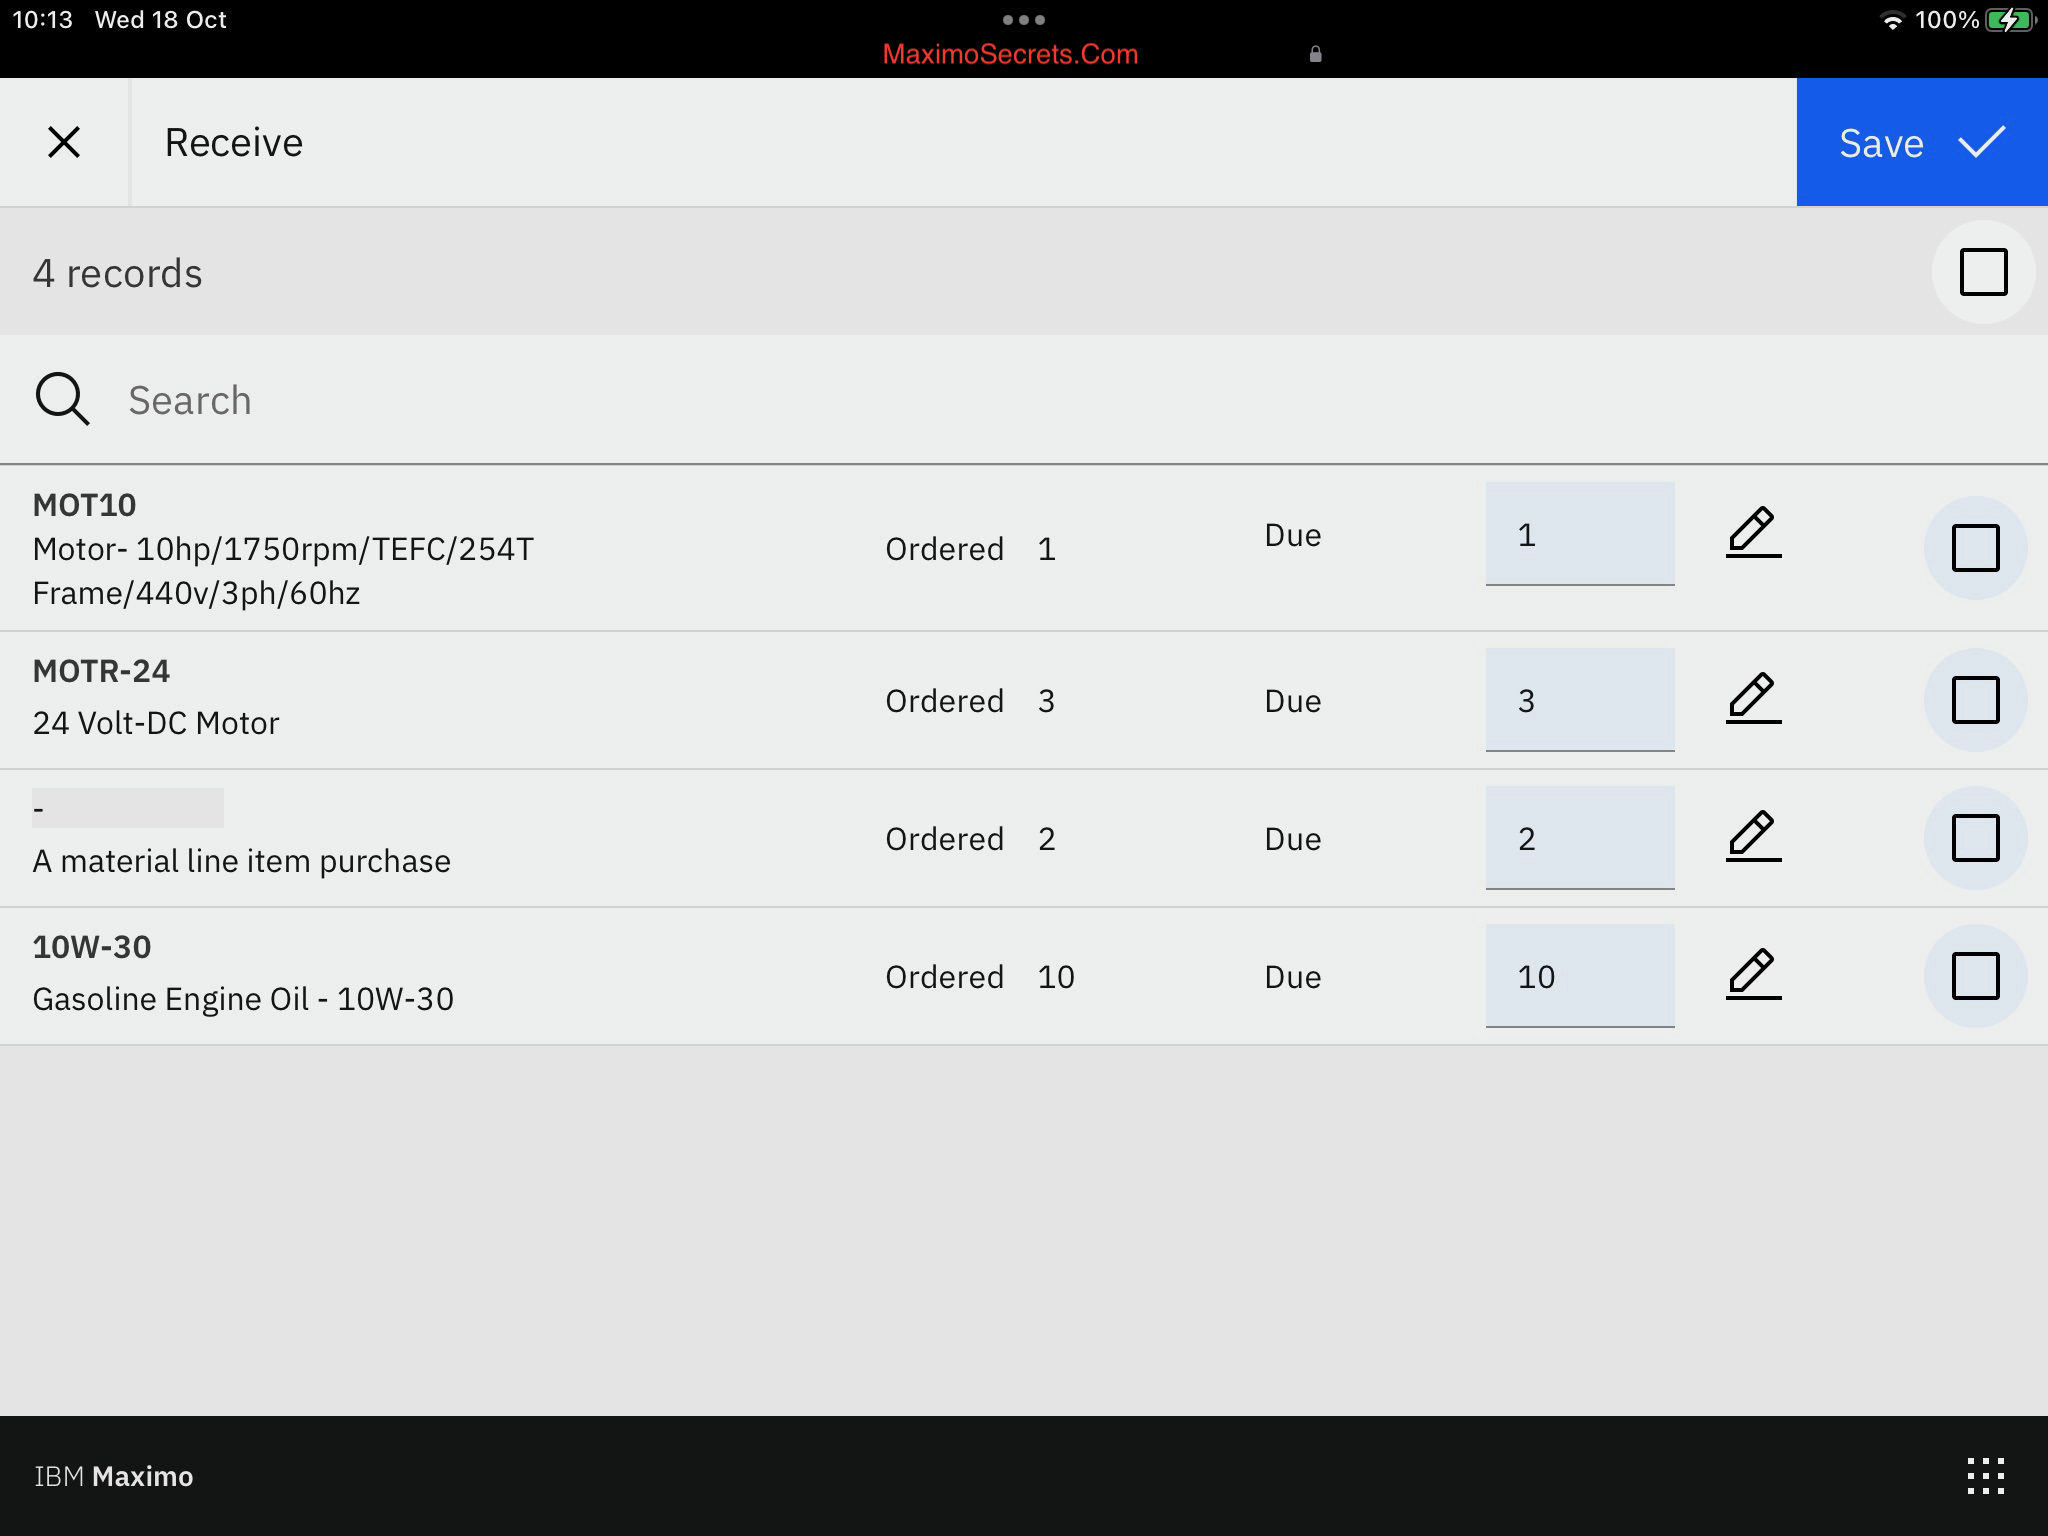
The Receive option shows the item ordered and its description, the quantity ordered and how many are due. You can amend this number to reflect how many were received.
There is no order unit of measure. I have raised this with IBM Support.

Before saving you need to select the item(s) being received and there is a box above the items which will select all rows. I have indicated that I have received the one item 11453, a mechanical seal, and I will now use the blue save button.

You will receive a green information message to show ‘1 material(s) received’ and that on this PO there are ‘No material to receive’.

On returning to the Open PO query there are now 13 records and PO 1017 will no longer be found because its Receipt Status is now COMPLETE which will exempt it from the Open PO query.
Receive Direct Issue Rotating Item
I have created a new Purchase Order (1094) with four PO Lines, a rotating item which is not against a storeroom (a direct issue), a rotating item to be charged to the CENTRAL storeroom, a material line type, and the 4th line is an item with a quantity of 10 but where I have set up a receipt tolerance of 10%, this line will also be charged to the CENTRAL storeroom. The PO has been approved and is waiting to be received.

At the bottom of the Open POs query you’ll find the new PO 1094 with a description of ‘Test of mixed order (storeroom and direct issue)’. I deliberately changed the Ordered Date of the PO to be different from the Status Date and I can confirm that the date shown is the Ordered Date. I had entered a Buyer and a Priority on the PO and neither of these fields are shown. Currently nothing has been received, the Receipt Status is NONE. The first Receive button is showing four items to be received.

Clicking the Receive button will show the 4 PO line records waiting to be received. Notice the Pencil button to the right of the Quantity Due field.

The Edit button allows you to enter a Packing Slip Number and Comments. The Comments are entered into the field marked as Remarks in the Receiving application (MATRECTRANS.REMARKS). You use the blue tick to close the edit screen without losing the details added.

To confirm the quantity received, then make any changes in the Due field, mark the record at the right-hand side of the record and use the blue Save button. You should receive the green ‘1 material(s) received’ message as before.

In the status page for PO 1094 found using the chevron (>) button at the right-hand end of the record in the Open PO page, you’ll see that the number of PO lines to be received has been reduced to three and there is one PO line that requires inspection. This is because PO Line 1 was marked as Inspection Required. You don’t see the Inspection Status field, but the material receipt will show it as WINSP – Waiting for Inspection.
If you look carefully the Receipts and Void options are now enabled, this is because there is at least one receipt that could be displayed or reversed using the Void function.
Inspect and Reject

In the Inspect screen you determine the quantity accepted and quantity rejected (we’ll see that screen in the next page). The Inspect screen also has an Edit (Pencil) button, which opens another screen allowing you to enter a Rejection Code and a Comment.
There is no domain associated with a Rejection Code (MATRECTRANS.REJECTCODE) in Maximo, it is defined as UPPER 6, so there ought to be a domain to support it. The comment will be entered into the same field (MATRECTRANS.REMARKS) as used in the Receive screen overwriting anything which you had entered previously.

If you do Reject a quantity, I would start with entering the amount you are going to Accept first as otherwise you will receive the error message ‘The sum of the accepted quantity and the rejected quantity is greater than the quantity to be inspected for the PO line.’.

I’ve corrected the Accept quantity to zero. You select the row before using the blue Save button.

The message ‘1 item(s) inspected’ is received. That completes the inspection step.
Receipts

The Receipts screen shows the Material Receipts that have been made against Purchase Order 1094. There are two lines the RECEIPT and then the RETURN transaction created when we rejected the quantity of one. Note for a RETURN transaction the quantity is negative.
The box at the end of the row will have no effect and is superfluous, it does not perform any action. This has been raised as an issue with IBM Support.
Receive Storeroom Rotating Item

Back on the Receive screen we will receive only a quantity of 1 of the item MOTR-24, a 24 Volt-DC Motor. I have changed the Due field to a quantity of one, selected the box at the right-hand end to receive only this line and then used the blue Save button. The item MOTR-24 is a rotating item, and we should go through the stages of inspection and serialisation with this record.
After save, you should get two messages – ‘1 material(s) received’ with a green background and ‘1 material(s) are required to inspect’ with a blue background.

If you reviewed PO 1094 from the Open POs query page, you would find that there are four items waiting to be received and one item waiting to be inspected. The first item MOT-10 was received and rejected and so is still waiting to be received. The second item MOTR-24 we had only received a quantity of one from the three due, and so this PO line still has outstanding receipts to be made, hence why it still shows as four.
You can navigate from the second button the Inspection symbol directly to the Inspection screen.
Inspect Rotating Item

I have navigated through to the Inspect screen and after inspection of the one MOTR-24 item received I have checked the box at the right-hand end and will use the blue Save button.

With the Inspection of item MOTR-24 complete, as it is a rotating item, we need to create the asset, the Create assets row indicates this. The Inspection Status will be at WASSET – Waiting for Serialization.
Create Assets for Rotating Item

The Create Assets screen has two fields to complete. The Asset number is the first and the Serial number is the second. As there was a quantity of one received, there was only one line, but you can have as many lines as the number received and inspected.
I thought at first there was no ability to Autonumber the assets received, but in later tests I just used the blue Save button without an Asset Number or Serial Number and found that the autonumber was used for the assets created.

I’ve entered an Asset Number (21006) and a Serial Number (X12-512378) and used the Save button, there was no box on this screen for selecting the record. You will receive the information message ‘1 asset(s) created’ in a green background.
Receipts (Part 2)

The Receipts screen shows the processing of the RECEIPT and TRANSFER of the MOTR-24 item. The reason the second transaction type is TRANSFER is because initially the receipt is received into the holding location which in the standard MAXDEMO database is called RECEIVING. It is then being transferred to the CENTRAL storeroom.
Return a Rotating Item

It might seem obvious, but you can only return a rotating item after inspection and serialisation processes are complete.
The Return screen shows only the one item that can be returned, the asset 21006 – 24 Volt-DC Motor which was just created. The down arrow opens additional details, the Rotating Item (MOTR-24), Storeroom from which you are returning the asset (CENTRAL), the serial number of the asset (X12-512378), and the transaction date against which the asset passed originally into the CENTRAL storeroom (18/1/23 12:26:00).
You will need to select the item using the right-hand box and then use the blue Save button. The green message this time is ‘1 asset(s) returned’.
After the asset has been returned you will find that it is now at DECOMMISSIONED status and in the Assets application the field Returned to Vendor will be set.
Receive Direct Issue Material Line

The third line of PO 1094 was a Material line type which is a Direct Issue made against a LocationA physical place where assets exist and where work can be performed. More rather than the CENTRAL storeroom. It illustrates that as long as the Purchase Order has one line against a storeroom the Inventory Receiving Role-Based Application can still process Direct Issue PO lines as well as those of Material line type.
I’ve selected the third line and will now use the blue Save button.

Two messages appear, ‘1 material(s) received’ in a green background and ‘1 material(s) are required to inspect’ in a blue background. The Receive page no longer shows the Material Line and you need to close the page to inspect the material line just received.
Inspect Direct Issue Material Line

When inspecting the material line just received the Inspect screen has the same two quantity fields for Accept and Reject as we have seen before. The Accept quantity defaults to the quantity received. I won’t reject any of the items this time.
I’ve selected the record and will use the blue Save button.

Unfortunately I received an error message ‘The Boolean value of ITEM .ROTATING cannot be retrieved. BMXAA4118I – The Boolean field is blank and requires a value. BMXAA7135E’. I’ve reported the issue to IBM Support, it seems that while you can receive a material line, you can’t yet inspect it.
Receive Storeroom Item with Receipt Tolerance

For the fourth Purchase Order line for Item 10W-30 Gasoline Engine Oil – 10W-30, this is a stocked item in the CENTRAL storeroom and for this item I have set up a receipt tolerance of 10% which hopefully will allow me to receive a quantity of 11. In the Due field if you enter a quantity of 12 when only 10 were received (+20%) then you will get an error message ‘Exceed the quantity ordered.’.
I get the same error if I try to receive a quantity of 11 and I infer from this that receipt tolerances have not been implemented yet. I have raised a case with IBM Support, and they have confirmed this so I have raised an idea (PMR) and you can vote for it here https://ideas.ibm.com/ideas/MASMOBILE-I-401
I received a quantity of 10 by changing the Due field to 10, selecting the right-hand box and pressing the blue Save button.
Void Receipt

Voiding a receipt is an action that reverses a previous receipt. It is used when you make a mistake during the receiving process, either you notice it immediately or when you receive the vendors invoice, i.e., during the invoice matching process.
The Void screen opens showing receipt lines for the purchase order that can be voided.
I’ve selected both the material line and the receipt for the 10W-30 Oil which I just received. I’ve used the box above the two receipt lines and then the blue Save button.

The message ‘2 receipt(s) voided’ is received in a green background. There are ‘No void items’ remaining.
Receipts (Part 3)

There are now several receipt transactions including the most recent ones for the receipt of the material line and the 10W-30 oil and their subsequent void transactions with a transaction type of VOIDRECEIPT. Void receipts have a negative quantity.
The records are ordered according to how they were processed for the PO using the Actual Date (MATRECTRANS.ACTUALDATE) but what is missing from this screen is the PO Line Number, although you could search by using the item number.
Receive Lot Items

When you receive a lot item, in this case item 11453 – Seal, Mechanical, Self Aligning- 1In ID, then the Edit screen (Pencil icon button) will show three additional fields for the Lot number, Shelf life (days), and the Expiration Date. The Expiration Date has a date lookup where it is easy to navigate to the next year if that is required.

I’ve added a Shelf Life and Expiration Date which are not the same, just to see which takes priority, both are accepted. In Maximo if you enter the Shelf Life the Expiration Date is calculated, but in the test, I performed if you entered both fields then the values you enter are accepted. I would either enter a Shelf Life or an Expiration Date, but not both.
Receive Condition Enabled Items

When you receive a condition enabled item, in this case item LN7023 – Alternator, then the Edit screen (Pencil icon button) will show one additional field for the Condition Code. This field defaults to that entered on the purchase order, NEW in this case.

The Condition Code field has a lookup which shows the condition codes for the condition enabled item, NEW, REBUILT or USED for item LN7023. The Condition Code can be changed from what it is on the purchase order, here I have selected REBUILT.
I think it would be unusual to accept a different condition code to that which was ordered without going back and revising the purchase order. When you match to the receipt during invoicing it will still have the unit cost for the NEW condition code, although you have accepted a REBUILT one, which presumably would typically cost you less.
Receive Item shows Item Image

When you receive an item, in this case item IPHONE14PMAX – Apple iPhone 14 Pro Max, then the Edit screen (Pencil icon button) will show the item’s image if one exists.
Return a Lot Item

When you return a non-rotating item (Materials tab) there is a slightly different screen from a rotating item (Assets tab) because you can choose the quantity of the items to return. The fields include the item number, item description the transaction type of Return and the actual date of the original transaction from which the item is being returned.
For the selected item 11453 being returned, this is a lot item and the screen does not provide you information of the lot number that is being returned. The same applies for item LN7023 a condition enabled item, there is no condition code displayed. However, this is also the same on desktop Maximo Receiving application.
After saving you will receive a green information message to show ‘1 material(s) returned’ leaving the remaining item LN7023 displayed.
Enhancement Ideas
While writing this article it became apparent that some information that is useful during material receiving has not been included yet in the application, and I have raised some IBM Ideas for these:
Provide a screen for PO Line Details
When receiving items there are other fields on the PO Line which are useful to ensure you are receiving the right item. There should be a button on the Receive screen to show a screen with PO Line details including Manufacturer Name, Model, Catalog #. The Requested By is also a field used for Direct Issue Items, i.e., the person to inform who will come and collect the item. The Display Name of the Request By Person should be displayed. The Work Order number would also be usefully displayed to be used when dealing with receiving issues. There would be no editing on this screen. https://ideas.ibm.com/ideas/MASMOBILE-I-398
Add the To Bin field to Receive-Edit screen
When receiving an item to a storeroom the To Bin will be defaulted from the Default Bin, this tells the storemen where to place the item, but it should be modifiable and should be added to the current Edit screen.
The To Bin determines what record is used in Inventory Balances. If left blank, you would need to follow-up with an intra-storeroom transfer when you do physically place it in the required bin.
https://ideas.ibm.com/ideas/MASMOBILE-I-399
Support for Receipt Tolerances
During receiving you should be able to receive a quantity greater than the PO quantity as long as it is within the receipt tolerance. This is the PO Line Quantity plus the Receipt Tolerance POLINE.RECEIPTTOLQTY. The standard warning message should be output ‘BMXAA5827W – A quantity of 11.0 is being received against PO Line 4, which exceeds the ordered quantity of 10.0 by 1.0.’.
https://ideas.ibm.com/ideas/MASMOBILE-I-401
Object Structures for Inventory Receiving
The Inventory Receiving Object Structure is MXAPIPO and the query is IROPENPOMOBILE with a Query Clause of ‘status in (select value from synonymdomain where domainid=’POSTATUS’ and maxvalue=’APPR’) and receipts in (select value from synonymdomain where domainid=’RECEIPTS’ and maxvalue in(‘PARTIAL’,’NONE’)) and historyflag=0 and siteid = (select defsite from maxuser where userid = :USER) and (exists (select 1 from poline where ((storeloc = (select defstoreroom from maxuser where userid = :USER))) and (ponum=po.ponum and revisionnum=po.revisionnum and siteid=po.siteid)))’
The records you see in the Open PO query are at an approved state, APPR (or a synonym) where the receipt status is either NONE or PARTIAL (or their synonyms) and where there is one purchase order line where the storeroom is the users default storeroom as defined in their Profile – Default Information and field called Default Storeroom for Self-Service Requisitions.
This default query will not find open purchase orders which are completely direct issue or contain only material lines. It cannot be used for returning items after the receipt status on the purchase orders has reached COMPLETE status. It cannot be used where the user works from multiple storerooms. Additional queries can be created to satisfy those requirements and you might find that it is more applicable to hard code the storeroom names rather than rely on the user having to change their profile setting for their default storeroom.
The default sort order is by the Order Date on the Purchase Order (ORDERDATE).
Leave a Reply